I think that my film is definitely fit for purpose, it was planned to be a short coming-of-age drama and that is exactly what it is. Its a 5 minute short drama that follows the relationship of a young couple and this is the basic description of a coming-of-age film. In the proposal I stated that the films purpose is to be a short entertaining piece of endearing art and I believe that it accomplishes this. The focus group I conducted, consisting of people in the targeted audience demographic said that they enjoyed the film, especially the visual elements. My film does follow some of the codes and conventions of its genre. It follows the most important ones which are the classic Hollywood style and story. The style used by this genre is almost always the classic cinematic Hollywood style like in films such as the Spectacular Now (figure 1) or It’s Kind Of A Funny Story (figure 2) where the colours look natural yet cinematic and the shots are usually quite neutral with nothing too ambitious for the most part. I took this style into consideration when composing my shots, which can be seen in figures 3 and 4. I framed most of the shots in my film either as a wide establishing shot or a medium close up. The genre is also known for adopting some techniques from french new wave; a coming-of-age film that does this is Submarine. these techniques include the use of montage for showing the two weeks of Oliver’s and Jordana’s relationship and awkward cuts (like the first kiss scene under the pier) to emphasise the character, personality and emotion of a situation. An example of an awkward cut in my film is the really quick cut to a close up from a wide in the first scene to show the annoyance on Michael’s face and show to the audience that he’s irritated. I also utilised the use of montage (all of scene 2) and jump cuts (on the bus) in my film. For these reasons I believe my film follows the appropriate codes and conventions of the genre.
I could have improved my film’s fitness for purpose with several additions and alterations. Firstly I received a lot of criticism about the dialogue from the focus group, they said that it wasn’t well written and it was ‘cringey’. I think that if this was improved then more people would have enjoyed it making it more fit for its purpose to entertain. One convention of coming-of-age films is that they usually include a really good soundtrack, whilst my soundtrack was effective in conveying and emphasising the nostalgic feeling and infatuation between Michael and Isa it could have been more conventional. A song with lyrics about love and relationships accompanied by an acoustic instrument are indicative of this genre. I wasn’t able to do this because of the budget limitations and the fact that its only 5 minutes long so I could have a long soundtrack with many different songs. This only really works for features. If I had a really good soundtrack it would make the film more appealing for people to watch and make it more enjoyable. One song that would have worked perfectly is a Katie Melua cover of the song Wonderful Life by Black but I couldn’t obtain the rights to use the song. The impact that this song would have had on the audience is it would have given a them a better sense of the characters emotion and would have made the film appear to have a higher production value.
When I presented the film to the focus group, everyone began by saying that they enjoyed the film and they understood and liked the basic storyline concept. There main issues was with the dialogue (especially scene 3 on the bench), some of it was ‘cringey’. One of the main sections that they had a problem with was when Michael was reminiscing about visiting the park as a child and then saying how lucky he was to be there with her, they found this very cliched. Some people also suggested that I should have changed the dialogue to suit my German actress more as they felt she struggled to deliver the lines. This point prompted another person to suggest casting an English or American character may have been a better idea as it would be more fitting with the conventions of classic coming-of-age films; I do agree with this point and I will take the accent of actors into stronger consideration on my next project. Taking into consideration the first point the focus group made about the dialogue. I could have improved the film by writing a less cliche couple of lines for scene 3, this would have made the entire scene less ‘cringey’. What would could have improved the film is if I had time to sit down with the actors and let them develop the script to make it sound more natural. I wasn’t able to do this with Karla as she was a last minute replacement meaning her lines are tailored for an English speaking actress.
One aspect that everyone liked was the cinematography with people saying it was ‘shot beautifully’ and it ‘looks great’. I’m very happy with my cinematography because it looks beautiful and conveys the correct meaning its supposed too and these are the two main thing the cinematography is meant to do. One of the main reasons a lot of people are saying its so pretty is because I shot half of the film in either golden hour or just with beautiful natural lighting. I did this at the happy points of the film so the cinematography can make the audience happy and this then helps them empathise with the characters in there happiest moments (like when they first meet). The group picked up a few issues with the film, first being the shot where the two characters see each other for the first time. The characters are positioned in a way that makes them look like they aren’t looking at each other which is something I agree with and only figured out was a problem in the edit so was too late to correct. This problem is all down to forgetting to stick to the 180 degree rule where the camera can only shoot from one side of the line of action. Essentially Michael look from left of the screen too right then Karla changes from looking towards the left to looking to her right, this makes it look like they’re looking in the same direction. A point they brought up that I don’t agree with was they thought the grade was inconsistent throughout the film, I graded the shots differently based on the lighting in the scene, some shots are outside and some are inside so they do look different.
I was responsible for the directing of the film and the cinematography. On reflection I should have trusted someone to deal with the cinematography because they would have been able to focus all their efforts on it, I couldn’t do this meaning I made mistakes. I messed up the white balance on the opening shot meaning that I couldn’t fix the image that much in post-production (see figure 5). I should have focused all my efforts on directing the actors. This problem became apparent when shooting for scene 3 and I was so focused on the cinematography that I missed the perfect lighting time and the I forgot to give the actors and other crew proper directions, I then had to scrap the footage from that shoot because it wasn’t useable. Because my attentions were drawn towards the camera department I didn’t realise that the actors said slightly different lines each take which made the editing process very difficult because I couldn’t use certain angles. I think that besides not be completely focused on the directing I still made a good move, the audience still understands the story and the character emotions. I’m also happy with the majority of the cinematography that did go well, this film contains one of my favourite shots (see figure 6).
A lot of the research and pre-production work did help with the successes of this film. The location recces and test shots especially, this meant that when I got to set the crew could set up and I knew exactly what I was going to to shooting. This was especially helpful with the shots of Karla at Stanage edge as I didn’t have as much time with her, I had planned the positions of the characters before so I didn’t have to figure that out on set (see figure 7 for the shot at Stanage). The major part of the planning that really helped was the call sheets and especially the timetable, because of these everyone knew when they were needed, what they were doing and where the shots fitted in the film (see figure 8 for the timetable). One time that I wished I had conducted more extensive pre-production planning was on the first shoot of scene 3 and I hadn’t actually done lighting tests on location, I found that it was completely different to in the TV studio and so I had to make up the lighting whilst filming, slowing production.
I think that the film itself turned out well, but not as well as I had expected. It fits its purpose but its not the most enjoyable short film that I’ve seen. It didn’t achieve the exact “Hollywood” look that I had hoped for it and the characters weren’t as likeable or relatable as i’d planned for them. I would have also recorded more room tone for covering up obvious cuts in sound and making the editing process easier. If I was to start this project again the first two points that come to mind that I would change would be to hire someone else to write the script for me as writing is not my strong point and hire a cinematographer I trust to handle the camera department freeing me up to direct the film. I would also take the advice of my focus group and would tailor the dialogue to fit my actress with a German accent or cast an actress with an English accent that fits the dialogue. Overall I am happy with the film I’ve made. I think that’s its entertaining to watch because it throws the audience in at the end of the relationship and then they want to find out what happened in the rest of the relationship so carry on watching. I also think its enjoyable because of the beautiful cinematography.
This is the final schedule, I took everyone dates that they were available to film and put them in a table. I then added the predicted weather for each day and assigned the scenes based on the weather and peoples availability, this is what I came too. Obviously thing changed during the production week but the only major notable change was Thursdays shoot was moved to Friday but everything else stayed the same. I did then add one extra re-shooting day the following day but I arranged that with the cast and crew in person on set.
Story board
Kit list
For filming scene 4 on Monday the 1st of May at Stanage edge.
Kit I own:
Sony A7 mk2
Canon 17-40 f4L
Canon FD 50mm F1.4
15mm shoulder rig
matte-box and nd filters
Dry wipe clapper board
Kit to rent/borrow
Manfroto 545 video tripod
Samyang VDSLR 85mm T1.5
5 in 1 Reflector
Rode shotgun mic pro
Filming for scene 1 on Tuesday the 2nd of May at 22 Rutland Park
Kit I own:
Sony A7 mk2
Canon 17-40 f4L
Canon FD 50mm F1.4
15mm shoulder rig
matte-box and nd filters
Dry wipe clapper board
Slider
Kit to rent/borrow
Manfroto 545 video tripod
Ronin M stabiliser
Samyang VDSLR 85mm T1.5
5 in 1 Reflector
Rode shotgun mic pro
Marantz audio recorder
Rode shotgun Microphone
boompole and pistol grip
Deado tungsten lighting kit
Hot Gloves
Filming for scene additional scene 4 on Friday the 5th of May at Stanage edge
Kit I own:
Sony A7 mk2
Canon 17-40 f4L
Canon FD 50mm F1.4
15mm shoulder rig
matte-box and nd filters
Dry wipe clapper board
Kit to rent/borrow
Manfroto 545 video tripod
Samyang VDSLR 85mm T1.5
5 in 1 Reflector
Rode shotgun mic pro
Filming for Scene 2 on Sunday the 7th of May in Sheffield City Centre
Kit I own:
Sony A7 mk2
Canon 17-40 f4L
Canon FD 50mm F1.4
15mm shoulder rig
matte-box and nd filters
Kit to rent/borrow
Manfroto 545 video tripod
Samyang VDSLR 85mm T1.5
5 in 1 Reflector
Rode shotgun mic pro
Filming for scene 3 on Sunday the 7th of May at Meersbrook park
Kit I own:
Sony A7 mk2
Canon 17-40 f4L
Canon FD 50mm F1.4
15mm shoulder rig
matte-box and nd filters
Dry wipe clapper board
Kit to rent/borrow
Manfroto 545 video tripod
Samyang VDSLR 85mm T1.5
5 in 1 Reflector
Rode shotgun mic pro
Marantz audio recorder
Rode shotgun Microphone
boompole and pistol grip
Large 1×1 LED panel kit
Cast and crew contacts
Michael Simpson – Cast – 07713753117
Karla Wagener – Cast – 07418010303
Jake Bennett-Young – Crew – 07785306186
Morgan Goodsmith – Crew – 07429101140
Tiarnan Meely-Clark – Crew – 07469923430
Harley Matthews – Crew – 07584132298
Alfie Pretyman – Crew – 07946374915
Budget
all kit rental prices were taken from Hire A Camera, the first google result when searching for kit rental in the uk – https://www.hireacamera.com/en-gb/
Kit rental;
Manfroto tripod (Monday the 1st too Sunday the 7th) £12 x 7= £84
Samyang VDSLR 85 T1.5 lens (Monday the 1st too Sunday the 7th) £12 x 7= £84
5 in 1 reflector (Monday the 1st too Sunday the 7th) £4 x 7= £28
Rode Shotgun mic pro (Monday the 1st too Sunday the 7th) £4 x 7= £28
Ronin M stabaliser (Tuseday the 2nd) £85 x 1+ £85
Marantz audio recorder (Tuesday the 2nd too Sunday the 7th) £19 x 6= £114
Rode Shotgun Microphone (Tuesday the 2nd too Sunday the 7th) £7 x 6= £42
Boompole and pistol grip (Tuesday the 2nd too Sunday the 7th) £7 x6= £42
Blimp (Sunday the 7th) £5 x 1= £5
Large 1×1 LED panel kit (Sunday the 7th) £45 x 1= £45
Total (ex. VAT) = £557
Total (inc. 20% VAT) = £668.40
Transport costs
Monday
S11 7JN to Hillsborough College 4 miles
Hillsborough College to Millhouses 6 miles
Millhouses to Stanage Edge 10 miles
Stanage Edge to Millhouses 10 Miles
Millhouses to Hillsboroihh College 10 Miles
Hillsboruogh to S11 7JN 4 miles
Total miles done 40 miles
Tuesday
S11 7JN to Hillsborough College 4 miles
Hillsborough college to Loxley 2.2 miles
Loxley to Millhouses 8.4 miles
Millhouses to Rutland park road 3 miles
Rutland park Road to Millhouses 3 miles
Millhouses to Loxley 8.4 miles
Loxley to Hillsborough College 2.2 miles
Hillsborough College to S11 7JN 4 miles
Total miles done 35.2 miles
Friday
S11 7JN to loxley 5.5 miles
Loxley to Stanage Edge 11 miles
Sranage Edge to Loxley 11 miles
Loxley to S11 7JN 5.5 miles
Total miles done 33 miles
Sunday
S11 7JN to Millhouses 2.4 miles
Millhouses to City Centre 5 miles
City Centre to Rutland Park road 1.4 miles
Rutland Park Road to Meersbrook Park 3.5 miles
Meersbrook park to Hillsborough College 3.5 miles
Hillsborough College to Loxley 2.2 miles
Loxley to S11 7JN 5.5 miles
Total miles done 23.5 miles
Total overall miles done: 131.70 approximate cost £29
This mood board shows the two main colour pallets that I want to use for the film. The top half is the colour pallet that I want to use for the daytime scenes; the honeymoon phase montage, the opening scene with the fight the lower half shows the colour pallet I want to use for the evening and sunset scenes where they meet and where they talk about there relationship. The reasons I want to use these colour pallets for these scenes is that the pink and orange look are associated with romantic films so create a feeling of love and warmth which is what I want the audience to fell in the 3rd and 4th scenes. I want to use the orange colour pallet for scene 2 because the colour conveys happiness and in the scene the characters are happy.
To find out how to achieve this look I began by trying to advance my limited knowledge of colour grading in the Adobe CC suite. I looked found this video which explains how to make DSLR footage look more cinematic and how to bring jpeg images into speed grade for side by side comparisons. This will be useful to me as the first step to achieving the look I want. This is the Video https://youtu.be/vM-AAMKrcvQ.
Next I went to look at another colour grading tutorial from the YouTube Chanel Film Riot which spoke about the use of LUTs https://youtu.be/_4CsiaNn3uA. I decided that I liked there LUT package that they sold and it was on offer so I bought the package. The LUT package was from the Triune Store available here https://triune-store.myshopify.com/collections/ae-assets/products/triune-digital-assets-lut-pack. The next thing I did was shot some test footage whilst location scouting and performed primary tests on the footage to find out what LUT I like best for each this shot.
Grading tests for the scene 4
I found that for this scene most of the LUT’s were way too strong and contracted for the softer look that I want, for example the Guardians Of The Galaxy LUT (figure 1) was too teal and the Mad Max LUT (figure 2) was too saturated and teal. Finally I settled on a LUT to replicate the general grade of Skyfall (figure 3), I chose this LUT because of it realistic colour and how it dealt with an underexposed image.
Fig- 1
Fig- 2
Once I had picked the LUT I want to use as the base for the colour grade for the final scene I began tweaking the image to be perfect for the shot. I began by changing the colour temperature slightly to get the style I wanted (Figure 4), then I tweaked the saturation and hue of the individual colour (especially the reds) to make the skin tones look better (figure 5) and then finally I adjusted the exposure of the shadows and blacks to make the subject more prominent in frame (figure 6).
Fig- 4
Fig- 5
Fig- 6
Read articles about how the look and Principe is achieved and then shoot in that style. (write how it links to the scenes in my film.
I tested for the daylight scenes. Firstly I took some test footage for the daylight scenes (fig 7), then I went through my Lut package and found that the Lut for Inglorious Bastards fitted with the look I wanted to achieve (fig 8). I then played around with the exposure and colour saturation to get the perfect final picture (fig 9).
Fig- 7
Fig- 8
Fig- 9
Location scouting
The film has 5 scenes that include 2 montages, scene 2 and 4. The first scene I need a hallway of a house, ideally it should be quite long and wide so I can fit the lighting and other equipment in easily. The second scene which is the first montage will include several shot within the city centre, some with close ups and some with wide shots, six locations will be enough. The third scene will need a place for the two characters to sit down and talk, this will be set at dusk and outside so practical lighting will be needed. I’m thinking about having a location overlooking the city centre as I can have the couple silhouetted against the city lights. Scene 4 is not a montage but its short and has no dialogue. It will feature the same shot over and over to create jump cuts to give the affect of time passing, in this scene the character will be travelling somewhere. Scene 5 is similar to scene 4 but will include minimal dialogue, the character will be taking pictures in the countryside at sunset.
For the hallway I need for scene 1 I looked at three hallways that I know that I can have access too. The first hallway (fig 10 and 11) was very dark so filming at night when I want to would be almost impossible, it also had a small porch on the front which would make one of the shots i’m planing very difficult to pull off. It would also be the least flexible for times to film. The second hallway I looked at is perfect in terms of the aesthetic (figure 12 and 13), its also very wide so I would have plenty of room for crew, sound and lights, this location will be my first choice if I can get access too it for the planed filming day. The third location was good but not perfect (figure 14 and 15). It was very narrow and had a cold uninviting look about it that I didn’t picture for the scene, the upside too it is it has a lamp post right outside the doorway which will be a good natural light source. This location I have the most access too so it will be my back up location if I cant film in the second location.
Figure- 10
Figure- 11
Figure- 12
Figure- 13
Figure- 14
Figure- 15
The second scene is a montage that takes place in the city centre, I will need around 5 different locations. For this I looked at 14 different locations around Sheffield city centre and found 5 that would be suitable. For on of the shots I want a shilloeted shot of the couple crossing the road and one stopping the other to take a picture, I found 3 locations that fit the criteria, the first on Rockingham street looking up too West Street (figure 16), this probably looked the best visually but had the most traffic so finding a break in the traffic to get the shot would probably take a long time. the second location was Headford street (figure 17). This is a very quiet road so getting the shot without too much traffic would be easier, but there are buildings at the end of the street so the shot isn’t exactly what I wanted so I want use this location. The third location looks right for the shot but has less traffic than the first location. Its also on Rockingham street but further down the road where its less busy (figure 18). I will use the third location because its a good balance of aesthetics to practicality, I also looked at access and I found that there is a car park that’s only a 7 minute walk way and only costs £1 for 2 hours .
figure- 16
figure- 17
figure- 18
Another location that I would like to use in scene 2 is a large ornate building, possibly with columns. I found 2 in the city centre that would be good to film at. The first is the City hall in Barkers pool (figure 19), this location is my favourite visually but as its a busy aria, dealing with the public may become a problem on filming day. The second location that could work is the Weston park art gallery building (figure 20). It has a similar look to the city hall but is allot less grand. The upside to this location is the lack of public and Weston park is going to be another location I plan to get a shot in for the montage, one problem of this location is its very hard to find parking places as its near a hospital so has limited street parking spaces and the nearest car park is a 10 minute walk away.
Figure 19
Figure 20
The final place I needed to recce to asses its suitability is scene 3 where they are overlooking the city. I had two locations in mind, the first is the amphitheatre in the City Centre, this location is great as there is easy parking and lots of light for a night scene (figures 21 and 22). The main setback with this location is that its on a steep slope meaning filming from behind requires a wide lens but the wide lenses I have access to aren’t fast enough for filming in dark locations, the other drawback with the steep slope is that I cant film from the front without a platform to bring me up to the same level. The second location I had in mind would work allot better as there is much more space around the characters for crew and equipment (see figure 23).
Figure 21Figure 22
Figure 23
Music research
I want to look at what music I want to use for for the film, this its to speed up the editing process. Firstly I decided to confirm my understanding of copyright law. I did this by going to the library and taking out a book on copyright law. I began by checking exactly what copyright is and found out that ‘a copyright is a legal tool that provides the creator of a work authorship the right to control how the work is used, including the exclusive right to reproduce, distribute, adapt, display, and perform the work.’ (Fishman, 2012). My understanding of what I’ve just read is that copyright covers the creator of the work to control exactly what happens with the work, so for this reason I cant go and use any music. Upon reading furtherI came across a section about music music that wasn’t in the public domain, the section said ‘If you are dead set on using a particular copyrighted work, you can go ahead and do so if you obtain permission from the copyright owner for the use. Unfortunately, obtaining permission to use a copyrighted work can be a difficult and time consuming process and usage is usually not free.’ (Fishman, 2012). This means that a song that for a song that like and would fit perfectly in the film, if I contact the copyright holders and agin permission I can use the music in the film. I began the research into music by choosing a song from my film score library on Spotify that would work well in my film. The song I chose was a cover of blacks 1987 song Wonderful Life the cover is by Katie Melua. To get the permission to use the song I began with a Google search into how to find out the publisher for a song, I came across the website Ascap which can tell provide the rights owners and the contact details for most songs. This is the website Ascap https://www.ascap.com/repertory#ace/search/title/wonderful%20life/performer/Katie%20Melua.
On this website I found out that the rights to the song were owned with a 50/50 split between the writer (Colin Verncombe) and the publishers (Imagem). After finding out that the writer died last year I found the publishers website and got an email and telephone number for there London office.
As a way for finding another source of music I searched on YouTube ‘how to get music for films’ and I came across a video on the channel Film Riot called ‘compose music for your film’. It explains and promotes a program and Premiere Pro plugin thats used to easily score a film in realtime based on the tempo, mood and power desired from the music. I looked on there website and found that it costs either $9.99 for one month or $99 for a year, as it costs I will use it as a back up for music if I cant find anything cheaper.
Textural Analysis of a coming-of-age film
This is a textural analysis of a film within the genre i’m studying. The first will look at shot ideas and the structure of a montage within a coming of age film. This will help we when it comes to planning the shots for my production and giving me an idea of how to structure a montage.
The first scene i’m going to analyse is the montage sequence in Richard Ayoade’s Coming-of-age film Submarine. This scene follows the two main character having fun over the course of a few days, this sequence takes place at the height of the narrative arc, at the point where the protagonist is most happy in the film. The music playing in the scene is called Hiding tonight by Alex Turner, its a perfectly fitting song for the scene, it has a relaxing and mellow tone which puts the audience in the mood of the characters. My film will have a very similar montage to this one, I think that the use of this stye of music to put the audience in the right frame of mind is very effective and I will plan to do this in my film.
The opening shot is a tracking scene of the couple on a bike with a firework, this instantly sets the scene for the montage explaining to the audience what they’re doing, It then goes onto another tracking shot, matching the action. the rest of the montage is almost split up into almost 10 sub-scenes, theses sub scenes are where the couple take part in different activities. Each sub-scene has between 3 and 8 different angles covering the action but most of them are around 4 shots, none of them have any dialogue and aren’t linked to each other in anyway. I think they aren’t linked to each other because its set over different days, I can tell this by the non consistent time of day in each sub-scene. I really like this way of storytelling with montage that has scenes with in, i’m going to adopt this method for my montage, I will slightly interlace these sub-scenes thought to make it clear tot the audience that its on the same day. Within one of these sub scenes it will usually start with a close up or mid shot (example in figure 24), have two other angles covering the scene that give more information or progress the story of the scene (examples in figures 25 and 26) and then it will end with the establishing shot (example in figure 17). This backwards style really suits the film as its very quirky and reflects the characters personality, I like this method but it wouldn’t work with my film. I will adopt the 3 or 4 shot sub-scene structure as used in this montage sequence but I will arrange them in a more conventional manner, starting with the establishing shots.
Once I had completed the first draft of script I sat down with several people who fit in the audience demographic for my film or studied film and asked for their advice on the script and how I could improve it. This is the first draft of the script – Portrait People (WT). Ex. . Everyone agreed that the first scene was great, it sets the character up for the film and there relationship to each other, one person thought that using the term “I’ve had coursework to hand in” didn’t seem fitting at most uni students would hand in papers, so I changed the line too “Ive had two papers due”. When it came too discussing scene 3 a few people raised the concern that the scene made the Isa an unlikable and annoying character and at the same time making there relationship seem in jeopardy when it was meant to convey the opposite. I took note of this and changed the lines of her complaining to the couple having a joke about racing to the bench, everyone agreed this was a much better way of starting the scene. One of the people I spoke too suggested that there conversation about food made Isa sound whiney and annoying and the dialogue didn’t seem real, I began to think about this and thought back to real conversations Id had and changed the conversation to be about her not being able to decide where she wants to eat, I then shoed this to the focus group and they all agreed that this seemed like a very real conversation that most of them have had before. This is the second draft that was developed as a result of the feedback from the first focus group – Portrait People (WT) 2nd draft.
I shoed the second draft to the focus group and my lectures, they all agreed that is was much better but the conversation in scene 3 on the bench made them seem like they were almost arguing, I decided to scrap the conversation about food and change it to Michael telling Isa a nostalgic story about why he loved this bench looking over the city. I thought that this was a much better conversation for the two too have as it still seemed real but it also gave the characters motivation to be there. Most of the people in the focus group agreed with the change but some thought it was a bit too cheeky and preferred the previous version a bout food. I decided to stick with the change. This is the 3rd draft of the script – Portrait People (WT) 3rd draft. My lecturer and one other person in the focus group said that I needed to be more clear with the stage direction and add more parenthetical’s to the dialogue to help the actors deliver the lines like I wanted them too, I did this and then I got the final draft of the script. Portrait People (WT) 4th draft
Festivals and distribution
It seems there are two main ways to distribute my film, the classic festival circuit or the more modern online method. I read an article by Lights Film School, the article suggested that the classic film festival circuit was the best direction to go in because its more prestigious to have a film shown in a festival than online. I also found from this article that “the average entry fee ranges from $20 – $100”this is a massive factor to consider when i’m deciding weather or not too go with the festival route because I don’t have any budget left. One of the suggestions for balancing the cost to risk of entering the festivals was to do a split between different levels of festivals. “Submit 30% to major festivals, submit 50% to mid-range festivals, submit 20% to niche festivals”, this was from this online article – lights film school. When looking more into the differences between online and festivals I saw a very interesting image (fig 25) that compares the statistics between the both.
(figure 25)
(Jonny Elwin, 2011)
Looking at the statistics in this image, the online distribution plan is definitely the right way for me, its not as prestigious as the festival circuit but its free and it gets shown to allot of people. The purpose of my film is to be watched not make money, for this reason alone the option with more viewers is the better pathway.
I realised whilst researching online platforms that I could still enter festivals and have the film online. I googled enter my short film into festivals and I found the sites Withoutabox and FilmFreeway, they are both festival distribution platforms. https://www.withoutabox.com/filmmaker/festivalSearch#sort=-DEADLINE&categories=SHORT&statusType=ACCEPTING&page=1. In the platform there is a festival search tool, I used this to find the cheapest related festivals and I found the European independent film festival which is only $15 to enter so this will go on my list of films to enter. I wanted to find some festivals that are UK based so I found a list of great UK festivals to enter http://www.bfi.org.uk/education-research/bfi-film-academy-scheme/film-festivals-young-filmmakers I went though and found some that were cheap to enter. I decided that The Cinematic film festival Belfast, London Short film festival were good.
Once I had decided what festivals I wanted to enter I began research into online platforms. The main two platforms used are YouTube and Vimeo, I could put it on both but I wanted to find out which would be better. After some googling I came across a website discussing the pros and cons of Vimeo for film makers over YouTube http://filmshortage.com/youtube-vs-vimeo/. It made several good points, the first being that Vimeo has an ‘easy to find on/off HD toggle’ (Film Shortage, 2014) as opposed to YouTube’s hard to find setting button, this means that more people will watch my film in HD. Another point it made and one of the biggest selling points was that over half (56%) of the quality shorts were uploaded too Vimeo, this implies that any quality film I make should be swamped in the garbage that’s on YouTube. For one final decision maker I wanted to know more about the quality of the two sites, this blog https://blog.waterworld.com.hk/post/hd-quality-youtube-vs-vimeo compares the technical aspects of both sites. it states that ‘Vimeo’s bitrate is limited to 10Mbps for 720p and 20Mbps for 1080p’ (Blog.waterworld.com.hk, 2014) and ‘YouTube’s bitrate is limited to 3Mbps for 720p and 6Mbps for 1080p’ (Blog.waterworld.com.hk, 2014) so it appears that Vimeo’s picture quality is far superior as its compression is more than 3 times less than YouTube. based upon the research I think I will primarily use Vimeo to distribute my film because it has a better film making community on the platform and the video is less compressed meaning its better quality.
I conducted some research into what formats the festivals might need the film to be in to project it. I couldn’t find anything posted on the submission pages though Withoutabox and Film Freeway or there websites but I did find a website with a post dedicated to different formats festivals will and will not accept. I found that ‘There are many projectionists who still consider HDCAM to be the most stable format’ (Lobo-Navia, 2015) and they concluded this with ‘ If you can afford it and the festival accepts it, HDCAM‘ (Lobo-Navia, 2015). As the HDCAM format is unavailable to me because of the cost I kept on reading to fins domething that was. I then found out that I nedded to export a ProRes file and not a H.264, ‘The H.264 format was designed to encode high-quality video and audio content for streaming playback over the Internet. However, the same video that looks great on YouTube won’t look great on a large movie screen’ (Lobo-Navia, 2015) ‘Two popular codecs for proper video playback are Apple ProRes format and Avid DNxHD codec. Both also create lossy compressed video, but usually of much higher quality that holds up on a large cinema screen'(Lobo-Navia, 2015). Based on this research i’m going to export my film as an Apple ProRes file because it will hold the quality on a big screen, the festivals will accept it and it’s free. Next I conducted some more research into how to promote my film on Vimeo and give it the best chance of getting viewed. I found an article by a site called F-stoppers and it suggested two really helpful thing that I can easily do when uploading my film to Vimeo. The first helpful thing I found was that I should include a really eye catching thumbnail, ‘The thumbnail of your video is your movie poster. It needs to be intriguing and informative. Catch a viewer’s eye and convince them to watch your video’ (Berner, 2015). The second was that I need a really good and clear description ‘Your next area of focus should be your description. The first sentence or two should be a logline that boils the video down to its essential dramatic narrative in as succinct a manner as possible. This is your sales pitch to your viewer.'(Berner, 2015). I took these on board and used found a great frame form the film to use as a thumbnail, its saturated colours and great composition are really eye catching (figure 26). I then made a really simple yet descriptive video description – ‘A short coming-of-age story following three key stages of a young couples relationships’.
Figure 26 – the eye catching thumbnail for Vimeo.
During the editing process I came across a problem that occurred during principle photography, I had set the white balance wrong so the colour looked wrong. It was so wrong that I thought I had lost too much information too correct it. See figure 27 for the original image). I decided to research more advance colour grading techniques to see if there was a way to resolve my problem. I came across a video about correcting overexposed footage but the content still applied to my problem of potentially loosing colour information. It said that I should use the Lumetri colour panel instead of the exposure sliders which means that I have access to the individual RGB graphs and if I adjust them first then use the sliders I can alter exposure and colour without loosing as much information in the highlights. (Premiere Pro – Correcting Overexposed Footage, 2016). For the shot the colour correction see figure 28.
Film Shortage. (2014). YouTube vs Vimeo. What’s the best choice for your film?. [online] Available at: http://filmshortage.com/youtube-vs-vimeo/ [Accessed 1 Jun. 2017].
I began this week by discussing the project brief and the FMP proposal. On Tuesday I began writing the FMP proposal and discussed strategies for timetabling and scheduling. Later on in the week I completed writing the proposal and began writing the project action plan. I feel that my proposal was written well as I put in a lot of detail to the project concept. This means that I now know my own project a lot better and I will be able to plan for it easier. It also means I now know what character I will need, so I can start casting the parts. Discussing as a class the different timetabling and scheduling strategies was a very good idea as when it came to starting to write the project action plan it was easier, and the final action plan will be more detailed and accurate making it more useful to the production. I could have sped up this week and completed the action plan, this would have sped up the entire production leaving more time at the end for contingency. The only problem I encountered this week was trying to plan the post production process this far in advance. I found it hard to approximate how much time would be needed to spend on the different parts of the post production process and when it would start after the filming completed. I overcame this problem by thinking back to previous projects of a similar size and used the same timeframe as I did for them. I also left a 3 days contingency after the allocated time for any issues I may encounter in production that might set the project back. From this week I have learned that the more detailed and accurate an action plan is, the smoother and better prepared the project will run. Next week I will need to start by completing the action plan then begin with creating an casting call for actors for the film.
Week 2
This week I began by completing the projects action plan. After this I went on to create a casting call for actors. I decided to use the website Star Now as several people in the class had already used and had success with the site to find actors. This is the casting advert.
This is all I did this week as I was filming on a college run 48 hour film challenge for the second half of the week. I’m very happy with my casting call, its short, to the point yet informative enough for people to make a decision about applying. I also added a picture to the project advert to try and attract more applicants. Everything I did this week will have a very positive impact on the end result. The action plan will help the project run smoothly and on schedule, the casting call will hopefully mean that people who can act and have experience will play the roles in my film. This will have a direct impact with the end result as the film will be better with better acting. The 48 hour film challenge although not associated with this project was actually helpful to the production process. I learned new lighting techniques whilst filming which will help in production and I got a chance to see how everyone in the class works on set so I now know who I will want to choose to work on my film as crew. To improve the applicants for the casting call I could have shared the page on the social media page to try and ensure that more people are aware that I am looking for actors. The main things that I have learned from this week is how to work better as a team and whom in my class is good at certain roles on set. Both of these were learned during the 48 hour film challenge. Next week I will start by sharing the casting call on the Facebook page and my personal page to try and get the call out to as many potential applicants as possible.I will then proceed to writing the storyline and beginning writing the script.
Week 3
The first thing I did this week was post on the film Facebook page a link to the casting call for people to share, this is to hopefully attract more actors to apply.
I then began with working on the storyline. I came up with all the scenes that I would need and began to think about the locations that these would be shot in, one of which probably wouldn’t have power and would be shot at night so battery powered lighting was key. I did a quick test with the lights I had available to check that they would be powerful enough to light a scene at night, I found that they were, so renting lights wouldn’t be needed. Once the storyline, scenes and the actions were decided on I began with the script. I didn’t get as far as I had hoped with it this week though, as I struggled with writing dialogue alot more than I had anticipated. Due to my lack of experience in writing dialogue I found it difficult, but I got around this by rewriting one of the most dialogue heavy scenes to show the audience the story through visuals and mood instead of telling them though dialogue. I’m happy with the idea to share the casting call online as I think that it will bring more people to apply for the roles. Im also glad that I did the initial lighting test as I’m now more clear on how I will produce the film. This week I was a bit slow with working out the story of the film so I didn’t get time to complete the first draft of the script and conduct a focus group to get feedback on it. I could improve on this by looking at the project action plan and sticking to it in order to keep on top of work easier. This week I have learned that its sometimes better to show the audience something rather than tell them through character dialogue. I’ve also learned that I need more experience in writing scripts. Next week I need to complete the script then conduct a focus group and then adjust the script according to the feedback. Then I should decide on the actors and send them a copy of the script to get their opinion. Lastly, I will go location scouting and write it up in my research portfolio.
Week 4
This week I began by going location scouting. I found all the locations I needed that were suitable for my production. I initially wanted to shoot scene 3 in an amphitheatre in the City Centre, but when scouting the location I found that as it’s on a steep hill I couldn’t film from the front because I wouldn’t have a tripod high enough to reach the level and I couldn’t film from behind because there is only 1.5 meters of room behind the actors. Later on though I went to look at a Meersbrook park after a friend suggested it as a location, it turned out to be almost perfect for my needs. It looks over the city like I wanted it too and it has a whole field of space around the filming spot, the only problem is there is alot less light in this location so I will have to bring LED lights to brighten the image and highlight the areas where the actors are to allow me to film at a lower ISO. I found that the location scouting and the research write up took alot longer than originally anticipated so I didn’t complete the first draft of the script this week. That will be first priority for next weeks work. This week I also messaged two of the males actors who applied for my film. I sent to Ross Cawton and Jack Midgley : Hi, My name is Henry i’m the director of the short film. Thanks very much for applying for the lead role, you are exactly who I need. Production will take place in the first week of May. It would be great to know if your available or still interested, if you are we can talk about the details. Thanks. Henry Rees. I’m just awaiting a response and for a few more actresses to apply. This is who applied for my film
With finding my actors I didn’t have much luck with the casting agency I used (Star Now). I had 12 people apply for the two roles (see figure 1). Out of the 12 that applied there were 2 males that would fit the role, Ross Cawton and Jack Midgley (figure 2 & 3) .I messaged them but found out that they weren’t available when I was planning to film so I couldn’t use either of them. I found my actress by looking on the suggested page on Star Now and finding people that would be suitable for the role, I then found them on Facebook and sent them a message. Out of the 3 actresses that I contacted on Facebook one replied. She’s called Isabella Wood and she’s primarily a stage actor but is interested in expanding to screen. Figure 4 is her Star Now page. I found my actor through asking around friends and people at college if they knew anyone suitable for the role. Someone got back to me with a man who studies performing arts at my college called Michael Simpson. I met up with him and he was perfect for the role so I gave him the part.
From the work I’ve done this week I’m happy with my location recce, I found a much more suitable location that will greatly improve the aesthetic of my film and the practicalities of the production day. It also helped me solve the problem of filming the public because I found a much quieter area that will work just as well as one of the locations for scene 1. Because of this I think the most important thing I have learnt from this week is that location recces can help alot more that I initially thought and that I shouldn’t always choose the first location that comes to mind. The main point I could have improved on for this week is my time management skills, I underestimated in my action plan at the beginning of the project how long it would take to complete each task so I’m now behind schedule. Next week I will need to complete the first draft of my script then conduct a focus group or get one to one feedback on the script and start making revisions to the script to make the second draft. I will also need to begin the storyboard.
Week 5
This week I Completed the first draft of the script. It can be found here –Portrait People (WT) . I was happy with the script because it’s my first time writing a larger amount of dialogue and stage direction and I think that I made the characters seem realistic and the dialogue suited the genre of the film. Once I had completed the first draft of my script I drew up the storyboard. This was really helpful to the production as I could now plan out the shot list and shooting order meaning I could then sort out the schedule and all the other pre-production documents. The main problem that I had over the past two weeks was the matter of writing a script with large dialogue sections because I had never done this before and so had little experience or knowledge in scriptwriting. I overcame this by speaking to a family friend who’s a script writer, she gave me some points on how to write dialogue which really helped because it gave me a good start. I then watched The Social Network written by Aaron Sorkin (a film renowned for its brilliant dialogue) and Submarine written and directed by Richard Ayoade, a quirky coming of age film, a very similar style to mine. I watched these two films because they would be the best for helping me solve my problem. Whilst watching I listened carefully to how the conversations were constructed and found that the subject of conversation needed to tell the audience something about the characters current mood and emphasise that particular section of the story. This exercise was extremely helpful as I could then complete a successful first draft. I think that next time I could have looked at more films to see how their dialogue compares to give me a more in depth understanding of some other genres. I could have also probably looked at some video essays on dialogue which could have given me some more ideas. Next week I will need to conduct focus groups on and finalise the script along with writing up a schedule to give to the cast and crew.
Week 6
Now that I had the first draft of the script I had to finalise it so I could send it to my actors, for this I printed out several copies and gave them too 4 people studying film and also my tutor in order to give me their opinions and some constructive criticism. The general trend of the feedback was that the first scene with the argument is brilliant and that I shouldn’t change it but the third scene where they are having a heartwarming conversation makes them seem like they’re arguing too much which doesn’t tell the audience that they’re in a happy stage of the relationship like it is meant too. To resolve this I sat down with each person and discussed what they thought would be a better conversation topic and then altered the script and asked what they thought about the revised script. I did this 3 times, each time I improved the script, making the story make more sense by making it clearer to the audience what the emotion in the scene is at that point. I’m happy that I conducted these one to one focus groups because they will greatly improve the final product as the script will be much better. Conducting the focus groups has made me learn that listening to other people’s opinions can be very useful as they can provide some great points and tips that will improve the final product. I think that I could have got a better script if I had asked more people to give me feedback and made a focus group of people who are the correct audience demographic for the film. This would have meant I got the opinion of people who would actually watch the film so they would enjoy it more.
Towards the end of the week I wrote up a schedule. I worked this around the dates and times the actors and crew said that they were available and the weather forecast. I found that not all of the cast and crew were available at the same time as each other so I broke the shooting order of the scenes up depending on which crew I needed for each shoot. The final shooting order meant I was filming Scene 1 on Monday the 1st of May (starting with the interior shots blacking out the windows and waiting for the night fall to shoot the exteriors), scene 4 on the Tuesday, additional shot for scene 4 on Thursday with just Michael, Scene 2 on Sunday daytime with only one crew member but both the cast and finally scene 3 on Sunday evening with all the cast and crew. and Next week is the week before production so I will need to complete all the pre-production documents and finalise the schedule.
Week 7
Week 7 began with a massive problem, my actress realised she wouldn’t be able to get the time off work to shoot for my film when I asked her to commit to meeting for a script read through. I was left with the task of having less than a week to find a the supporting role for the film. I spent a few hours looking on Star Now and messaging a few actresses from Sheffield to find out if some of them could do it but no one got back to me so I messaged the friend who acted for my proof-of-concept film to see f she would be my backup if I couldn’t find an actress in time and she agreed. Later that evening I remembered that I had met an actress (who fitted the role perfectly) at a party about a month before and she sounded keen to be involved in more on-screen acting projects. I contacted her on Facebook and she seemed really keen to work on the project so we met up so I could talk to her about the film and do a script run-through. After this issue I have realised how important it is to have some idea of a backup actor or understudy just in case something happens meaning a main role doesn’t have an actor, so in future I will always look for a backup. Another thing that I have realised is how useful networking is, without it I would have never met my actress and without it my film would have been a lot worse because I would have had to use a non actor.
This week I also had to slightly rearrange the schedule after realising that the Monday was a bank holiday so my college was closed. This meant that I couldn’t pick up the audio recording equipment I needed for filming scene 1. I got around this by switching the Monday and Tuesday shoot, this worked because I could then shoot scene 4 which has no dialogue, so requires no audio equipment, and then pick up the equipment on the Tuesday morning and film scene 1 with the dialogue on the Tuesday afternoon.
Week 8
This week was production week. I began with shooting scene 4 on Monday, I arranged to pick up the cast and crew who couldn’t drive and met the rest of the crew who could at the location on the call sheets I gave them. The first problem that I had encountered was that I hadn’t planed the shots for the first half of the scene, this meant that the beginning of the shoot didn’t run smoothly because I was having to plan the shots on the fly with the camera operator. In future I will definitely go to the location to plan the exact shots so production will run smoother. The second issue I had that day was the weather, it was much cloudier than what the weather forecast had predicted, this was a problem because it made all the shots look flat and didn’t match the sun soaked shots from later on in the scene. We shot the footage anyway but when reviewing it I realised that I would have too reshoot some of the beginning of the scene because they didn’t match the later shots in the scene. Luckily these shots only included Michael, for this reason I didn’t need to arrange a completely new shoot day. I had planed to film additional shots with just Michael on Thursday at the same location, so I reshot everything that was inadequate. The new shot looked really good. This decision to reshoot had a massive impact on the final product. Without it the film wouldn’t have looked nearly half as good.
Tuesday shoot went incredible well, I had planed all the shots and lighting out perfectly. We had originally planned to use the Ronin gimbal for the main opening shot but later found a slider provided much smoother movement for the camera. The screen on the camera isn’t very big and we didn’t have and eternal monitor, along with this the camera was moving so the focus puller found it very difficult to hit the marks. We got around this buy syncing up the camera to the Sony mobile app meaning they had their own monitor that was independent to the moving camera so they could hit the marks. One thing that I didn’t do well was setting the colour temperature on the camera, the shot ended up too warm and I will have to fix it in the colour grade.
Thursday shoot also went really well, The shots on the bus went great and the re-shoots from scene 4 look amazing because the sun was at the perfect level so all the shots match now. However I forgot to book out the equipment until on the day so I had to wait around at college until someone was finnished with what I needed, in future I will book out the equipment in advance to avoid the chance of not being able to shoot.
The first half of production on Sunday went brilliantly. We got all the shots needed for scene 2 and it all went smoothly because I had planned out all the shots and the running order. The second half of production in the evening couldn’t have gone any worse. The actors and crew were freezing because no one Brough enough warm clothes, probably as I didn’t put it in the call sheet. We also couldn’t get the shots because I left it too late in the evening to get the shots and it got too dark. One the things I have learnt and can improve on from this shoot is that I need to send out more in depth call sheets talking bout what clothing will be appropriate and I also needed to do some more lighting tests so when it got dark I could get the shots I needed without having to mess around with different lighting setups. After the shoot I arranged a re-shoot for the Wednesday on the following week.
This week has had the biggest impact on the final product out of the entire production. I have filmed 3 out of the 4 scenes and planed to complete principle photography next week. Im very happy with the cinematography of the film so far, its some of the best work I’ve ever done. I think I also organised all the shoot days very well, everyone turned up and on time, I also only had them on set when they were needed meaning I didn’t waste anyones time. This weeks filming ha made me realise I could improve on my directing skills, I wasn’t directing all the crew to do there jobs, I ended up being too focused on the camera when I should have let the crew do there jobs and made everything run a bit smoother. I think that this comes with practice and experience though so next production I will have learned from my mistakes. I could have also planed the shots for scene 4 a lot better so I didn’t have to re-shoot, also I should have planed the lighting for scene 3 so I would have to book my actors in again to re-shoot next week. Next week I will start by with the assembly edit of scene 1,2 and 4 leaving space for scene 3 once its shot. On Wednesday I will then re-shoot scene 3.
Week 9
I started with assembling the shots from production the week before to make sure that I had enough coverage for each scene. I did this early on so I would have enough time to arrange more re-shoots if I found that they were necessary. Doing the assembly edit this early will also speed up the post-production process. In doing this I found that I didn’t need any pick up shots because I had enough coverage for all the other scenes. On Wednesday evening I re-shot scene 3, I made sure that I had much more professional crew so that I could leave them to do there job and I could focus on directing. I think that I directed this shoot much better than any of the others that i’d done in this project or any other. One of the problems that I faced was I couldn’t book out the LED panel lights from college because someone else was using them. I got around the problem by contacting a friend who had one smaller light that I could use. I also asked my tutor to help with the lighting setup as I know that that’s my weakest skill. We ended up using the LED light and bouncing the light from our phones to create separation between the actors and the background. I’m very happy with the results from this. The re-shoot had a great impact on the quality of the end product, the film will now look more professional and be complete with all the scenes I had originally planed. I think that I was right to hire more professional crew for this re-shoot and have my lecturer on set as an advisor if anything went wrong because this ensured the shoot went smother than before and the end product came out as I’d expected it too. From this, I learned to hire professional crew in the first place so the job actually gets done well and also plan for more contingency time for potential re-shots. On this shoot I also learned that letting the crew do their job whilst I direct all the departments and the cast, would be a much more efficient way of directing, as opposed to me trying to take the role of DP at the same time. On the next project I direct, I will take this directing approach and hire crew I can trust to do the job to the standard I expect and then leave them to it. Next week i will begin editing, starting with the organisation of the rushes, completing the assembly edit and hopefully get near to picture lock.
Week 10
This week began with the organisation of the rushes, I was really glad that I had used a log sheet during principle photography because it made this job easy and quick, I just labeled all the clips with the shot and the take number. After this I imported all the rushes and files I needed into Adobe Premiere Pro and assembled them on the timeline in the order I needed them. I then trimmed them all to size to make the basic assembly edit. At this point I came a cross my first problem, i had worked with amateur actors meaning they hadn’t said there lines exactly the same every time meaning cutting the different shots together was very difficult as the lines didn’t fit together properly. This made the entire process for getting the film to picture lock much longer. I got around the problem by not using sections of certain angles and cutting to a wide where the actors mess up so you cant see there mouths move. This process took quite a while to get it to picture lock and it could have gone a lot quicker if I had checked the script whilst the actors were reading lines, this is something I can improve on for my next project. This weeks works has influenced the end products assembly and the pacing of the entire film. Next week I will have to colour grade and add music and finish the audio edit.
week 11
Now I had the project at picture lock , I Completed the audio editing, adding keyframes to change the volume of the dialogue to keep it a constant level. I’m happy with the result of this. I also added an EQ effect to some clips to alter how it sounds. I had to do this to remove some of the echoes that could be heard in some shots, especially the lines in the corridor in scene 1. Once I had the audio edit complete I added the music, I found that the backup music program I had planned to use didn’t have any music that fitted the style I wanted to create, This was my first notable problem of the week. I solved this by thinking back to previous projects and thinking about cheap places I got music for those films. After searching through Soundcloud I remembered an artist called Johnny Ripper who makes alternative music that would fit my film very well. I had used one of his tracks before so I knew that I could legally use them on this project. After searching through his music I found three tracks that would fit my film and then purchased them. This took a while and slowed the post-production process down considerably.From this problem I have earned to do more extensive research before the production to find the exact tracks that I will use in the film. The second issue I encountered this week was that the tracks that would fit my film changed the style halfway through them meaning the section of the song that I wanted to use wasn’t long enough to cover the scenes I had intended them for. I got around this by chopping up the song into the sections that I wanted, looped the sections and merged them back together, this made the song the exact length I wanted it so it could fit into the timeline perfectly.
Now that I had the picture and audio complete I turned focus to the colour and exposure. In research I had planned the colour grade and found the LUT’s that I was going to use, This made the process very quick for most of the film. There was one clip that I really had a struggle with grading. This was the third problem of the week. On the opening shot of the film I had accidentally set a warmer white balance that planned, this resulted in a really tungsten look that didn’t fit with the rest of the film. I applied the LUT that I had planned to use and it really didn’t work well so I reverted back to the original shot. I then did some research into saving footage that had lost information in colour, shadows or highlights.
From this week’s work I have learned to always check what white balance the camera is set to because it very difficult to correct it in post production and impossible to correct it entirely. I have also learnt a better way of colour grading using the lumetri colour panel and the RGB scopes. Looking back at the film whilst conducting the focus group I realised that I didn’t achieve the “Hollywood” look that I wanted from the film and it was too warm; I could have done a much better job of the colour grade. Next week I will be conducting a focus group to get feedback about the film and the writing an evaluation.
Week 12
The first thing that I did this week was upload the film to Vimeo like I said i’d do in the distribution plan. Once I did this I arranged a focus group of people in the targeted audience demographic and people who study film. I gathered their feedback which was mostly positive but with some really helpful constructive criticism. I’m happy that I have done this because I got the honest feedback of people who would actually watch this film which will really help me in the evaluation. Next I did the evaluation. I discussed what went well and what I could have improved on, all whilst reflecting on the focus groups feedback. This was really helpful because it made me me think about the film and realise what I need to improve on for my next project. I think that I could have improved my focus group by getting more opinions from a wider range of people, maybe some that weren’t in the audience demographic for this particular film. This would have been helpful because all feedback is good, as it highlights what I need to improve on. From this week’s work I have learned that a focus group is a great way of getting a large amount of feedback quickly. I’ve also learned from this feedback that I need to improve on my casting and my script writing.
Through the past 12 units I have been increasingly interested in exploring lighting and cinematography in more depth so for unit 13 I would like to produce a very visually demanding film. I will try to achieve a more stylized look with the lighting, utilizing the 3-point lighting technique I learnt this year. Coming-of-age films are my favorite genre, probably because I’m a teenager so I can relate to the main character’s problems, so I would really like to produce my own because I will be more interested and passionate about the film. For these reasons I want to make a very visual coming-of-age film about two young creative people. The fact that the characters are creative people will allow me to experiment allot more with the cinematography and do different things with the camera and lighting I normally wouldn’t in a genre with more fixed conventions such as sci-fi or film noir thrillers. I want to make the film for people who enjoy coming-of-age films, those who watched and enjoyed other films such as Perks Of Being A Wallflower and Submarine which are my main influences for this film and me as a filmmaker. I want to do this because there arent enough shorts in this genre.
Section 2: Project Concept (Approx 200 words)
The film that I want to make is a coming-of-age film that follows three stages of a young couple’s relationship. The film will start with showing the relationship in trouble with the two main characters arguing about him working too much. It will then progress to show the relationship 3 months before when they were happy and have a montage of them together. The film will end with them reminiscing of the day they met and then show where they met and it ends with them both saying hi to each other for the first time. I want to make the film with this non-linear storyline as it will allow me to compress and otherwise really long story into a 5 minute short whilst keeping it interesting as it will reveal the story in segments to the audience, keeping them on there feet.
One of the key point of the story in the film is the inevitable end to all relationships, especially young ones. This isn’t usually the the story told in classic Hollywood romances because the filmmakers want the audience to be happy so they get more money but as a student film my film can explore these darker more realistic storeys without having to worry about a return on investments. The film also explores the point that people change over time and get bored and this is the main causation of characters breakup. This film is very relatable to myself and the audience as we have all been in at least one of the three situations that will be told in the story.
The locations I will probably use in the film might include, a dark room for the first scene, a bench overlooking the city at night, Leopold square in Sheffield City Centre and a living room for the second scene and Stanage Edge for the final scene of them meeting. The equipment I will use will be a Sony a7ii with canon 17-40 f4L and an FD 50mm f1.4. I will use this camera and lens combination because I own them and so have free access to them meaning I wont have to use any of the budget on camera/lens rental. For the audio I will use a Marantz external audio recorder and sync the audio in post production because it will give better quality sound than the internal microphone on the camera, therefore raising the quality of the film. For lighting I will use a Kino Flo panel light in the dark room to make a bright single source key light and 2 Deado 350w spot lights as fill. When shooting any of the scenes outside I will use reflectors to bounce natural light of its daytime and two 1×1 LED panels for if it’s night time. I will use these for the outside shots because I Won’t have access to power as the budget won’t stretch to as far as getting a generator.
I hope that people will think of the film as an entertaining, endearing piece of art. I plan for the film to be approximately 4-5 minutes and I will show it in festivals, the Facebook page and online streaming sites such as YouTube and Vimeo. I plan to try and get actors through a talent site called Star Now, If I can’t find anyone suitable I will use the two friends I used for the proof of concept. The actors expenses will be funded using the money raised from the crowdfunding page on Indiegogo.
Section 3: Evaluation (Approx 150 words)
Throughout the entire production process I’m going to keep a reflective journal, logging the decision making process, any problems that I have solved and how. This will also give me the opportunity to then learn from what I have achieved over the past few days and decide on what I need to do next as this may change as my ideas and production progresses. Once I’ve finished the initial edit for the film I will show the film to people who study film to get a more in depth response. I will then ask them to give honest feedback and then may make amendments to the edit based on their opinions. Throughout completing the reflective journal, I will analyse the past week’s progress, looking at what I’ve done well what I could do better with and what I will do the following week. This will ensure that I know what to improve on in the following week. I will also analyse every week to make sure that I am sticking to my original brief and concept.
The film I want to make is a coming-of-age drama featuring two creative young adults. It would follow the couple at three key stages of their relationship, focusing on showing the emotional differences and similarities at each stage with colour and cinematography. I want to make this film because I can relate to the characters more so I will be able to write and direct this type of film better. Also coming-of-age films are my favourite genre so I would really like to use this opportunity to explore this genre myself and improve my film making skills and knowledge. I also feel like this genre isnt attempted much in student films as it can be difficult to get right and for it to not turn out cliche so I want to go against the grain and attempt it. Another reason why I want to make this film is to explore more complex cinematography and lighting techniques by using the cinematography to reflect the main characters artistic personality by exploring more complex and offbeat methods such as long takes, montage and a very stylised warm look. This film will give me the opportunity to explore classic Hollywood lighting techniques such as 3 point and soft front lighting as they will fit with the coming-of-age genre.
The first place that I would turn to, to screen my film would be through festivals. The easiest way for me to do so would be to enter through festival distribution sites such as Withoutabox or Filmfreeway; they are easy to use and have thousands of festivals all around the world. The problem with this method of distribution is that some festivals cost money, but for a short film they never cost too much, up to around £25 each. Most festivals like to have either premiere status or only show films that aren’t on the internet, this is so they can sell more tickets. For this reason I wouldn’t put the film on streaming sites until after it has been through the festival application and screening process. When the time came to uploading the film too a streaming site I wouldn’t just use YouTube, I would explore other platforms such as Vimeo as the content on Vimeo is more for creative projects and the site holds its own competitions and gives awards for films like mine, an example of this is the Vimeo staff pick of the week.
The subject area of this report is lenses, specifically how different lenses reproduce and manipulate light in different ways. This report will explore and discover how these differences between lenses affects the story and emotion in a scene. This will help a DP, director or cameraman chose the best lens for conveying the emotion and story to the audience.
These quotes will be useful for research into anamorphic glass. The first quote is from the website of RED cameras and it describes what anamorphic lenses are.
‘Spherical lenses project images onto the sensor without affecting their aspect ratio. Anamorphic lenses, on the other hand, project a version of the image that is compressed along the longer dimension (usually by a factor of two).’ (Understanding Anamorphic lenses, 2017)
This is a reliable source as the camera company is used by industry professionals and so there website needs to be accurate for them to sustain business. The second quote is from the renowned cinematographer John Mathieson who said in an interview with Cooke Optics TV,
‘You need to make sure you have a lens that will help you get down there, and a spherical lens, even if its under exposed will look allot better under exposed than an anamorphic lens, because you get a true stop. they’ll hold the sharpness better, even though they’re under exposed the blacks will be solid. and an anamorphic lens when its under exposed, everything will start wobbling, you cant see the edges of things anymore, they mush in together.’ (John Mathieson, CookeOpticsTV, 2016)
This quote from John Mathieson is useful for understanding the characteristics of anamorphic lenses and its credible information as he’s a cinematographer with lots of professional experience with anamorphic lenses over many years.
The report will also include primary lens comparison tests. Cinematographers also do lens tests before choosing what lens to use on a film. The cinematographer Jarin Blaschke conducted lens tests and wrote about them in filmmaker magazine. He describes the characteristics of the different anamorphic lenses and how they will perform for his film.
‘The Series 2s still had a beautiful astigmatic swirl to the backgrounds and pleasant vignetting. Bright sources glowed for a little atmosphere, but not too much to totally destroy the image.'(Mulcahey et al., 2017).
‘I loved the swirly bokeh of the Series 1s, but Panavision didn’t have them all rehoused then. But they probably would have crossed the line in ghosting anyway with all the bright windows in the movie.’ (Mulcahey et al., 2017).
The magazine is very credible because its red by people in the industry so the information needs to be correct as the readers would know if its not. Even though the facts may be credible, some of his information is about aesthetics of a lens which is about personal preference meaning that someone else may think differently about a certain lens to him.
When researching the affects of focal lengths most books were not very useful. Some talked about focal lengths but its not very useful to this report. The first book says ‘ A telephoto lens visually “compresses”‘. (Artis, 2011, P46) ‘A normal lens (mid-zoom or 50mm if were talking 35mm DSLR camera prime lens) is the standard for close-up portrait shots of faces. A normal lens looks the most natural’ (Artis, 2011, p47).
The second book says
‘A lens designed to have a long focal length behaves as a narrow or telephoto system. The subject appears much closer than normal, but you can only see a smaller part of the scene. Depth and distance look unnaturally compressed in the shot.’ (Owens and Millerson, 2011, p105)
and ‘wide angle system takes in correspondingly more of the scene. But now subjects will look much further away; depth and distance appear exaggerated.’(Owens and Millerson, 2011, p105). Both books seem to agree with each other about how lens focal lengths affect the compression of space and the books are written by people who work in industry. Because of these points the information from these books are credible but they are more about freelance camerawork so don’t offer the most useful information to this report.
An article in the website Fstoppers talked about lenses and how to use them. Whilst talking about wide lenses they say ‘Let’s imagine that we want to create an epic scene showing off the drama of the landscape and the solitude of the runner within it. Using a wide lens to shoot from a distance will do just that. It will make the athlete into a tiny part of this grand landscape and will emphasize his solitude by showing the vast emptiness around him.’(Sasso, 2016). This is useful information as it describes one way of using a wide lens to affect the audiences perception of the scene.
The useful information from these articles, books and videos is how telephoto lenses compress the space in a shot, normal 50mm lenses make a persons face the most natural, anamorphic lenses have allot of imperfections that make them less suitable for shooting in the dark. This will influence the report by assisting with the understanding of lenses.
Bibliography
Artis, A.Q. (2011) The shut up and shoot: Freelance video guide: A down & dirty DV production. Boston: Elsevier/Focal Press.
CookeOpticsTV (2016) Masterclass || John Mathieson – choosing lenses (part 2) || Anamorphic and spherical. Available at: https://youtu.be/rWAp4Fv9RvE (Accessed: 30 January 2017).
 Figure 1
 Figure 2
 Figure 3
 Figure 4
 Figure 5
 Figure 6
 Figure 7

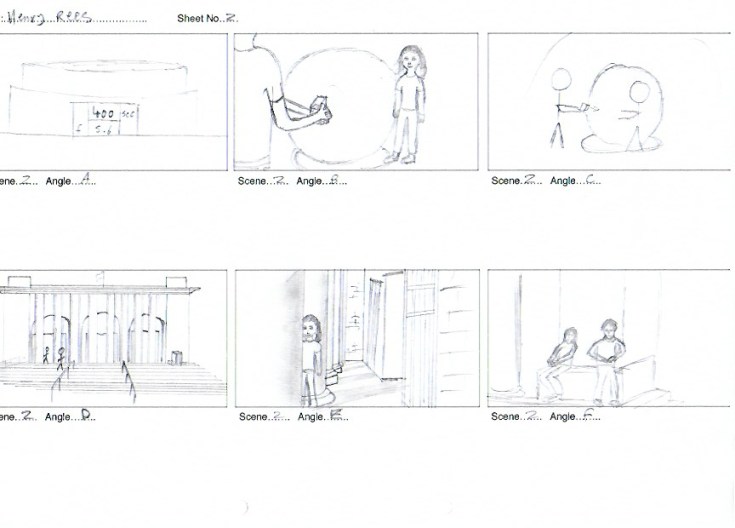
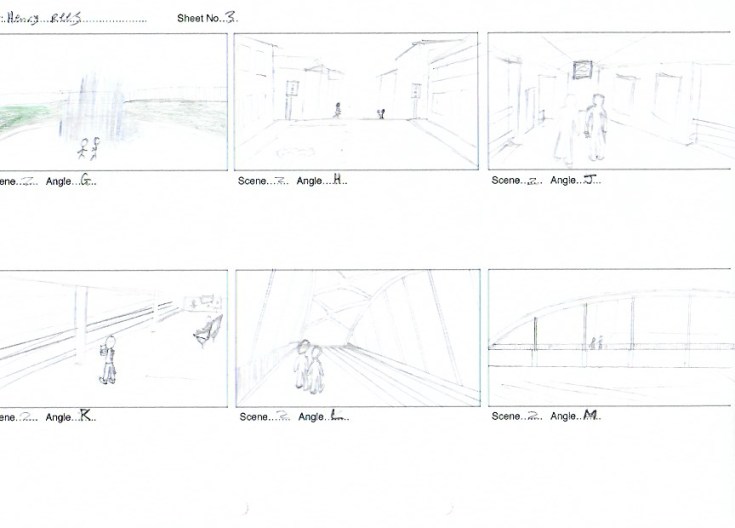
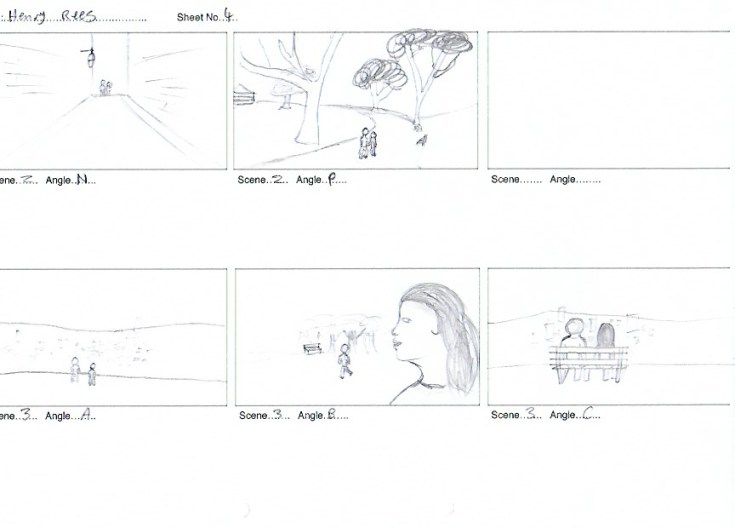
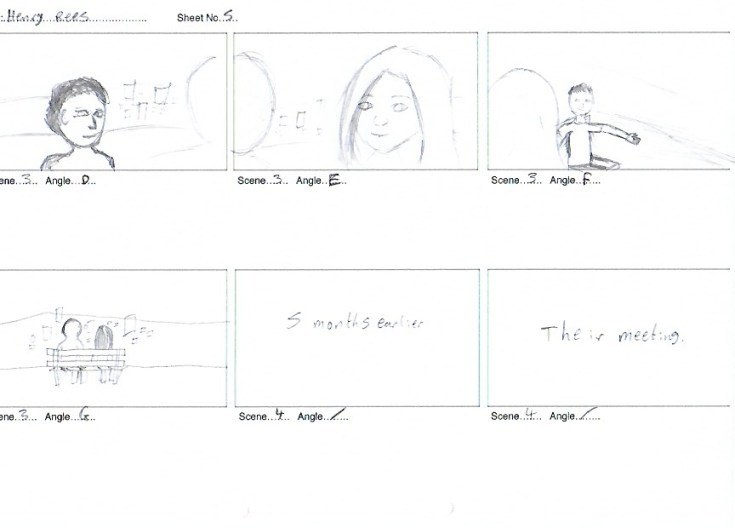
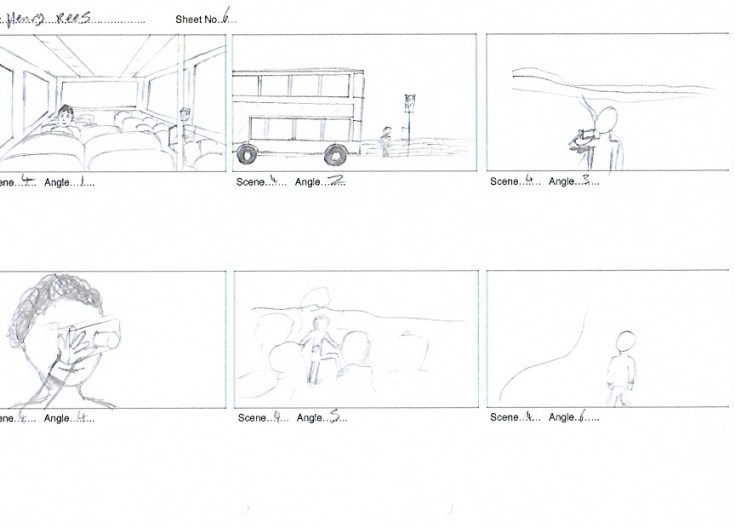

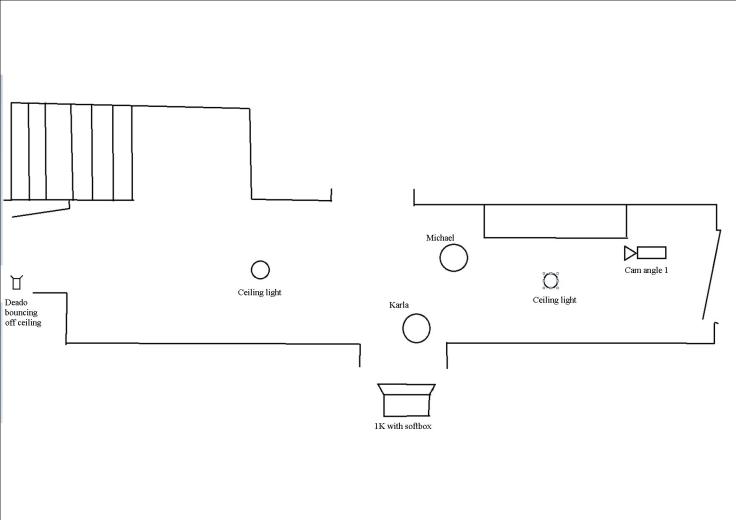
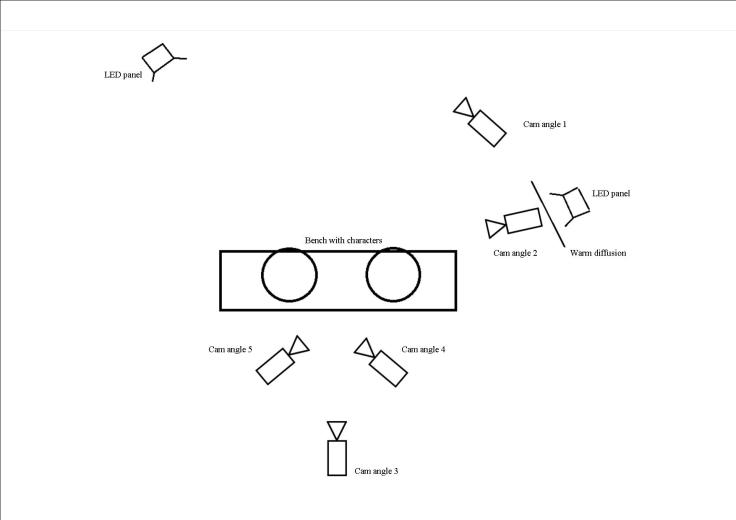
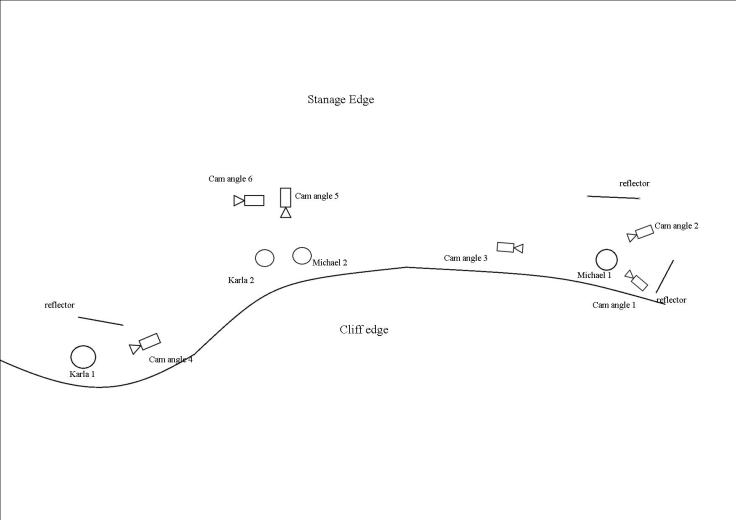


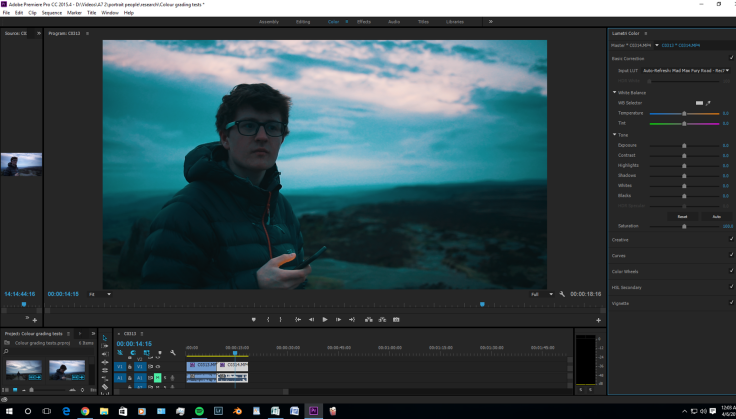
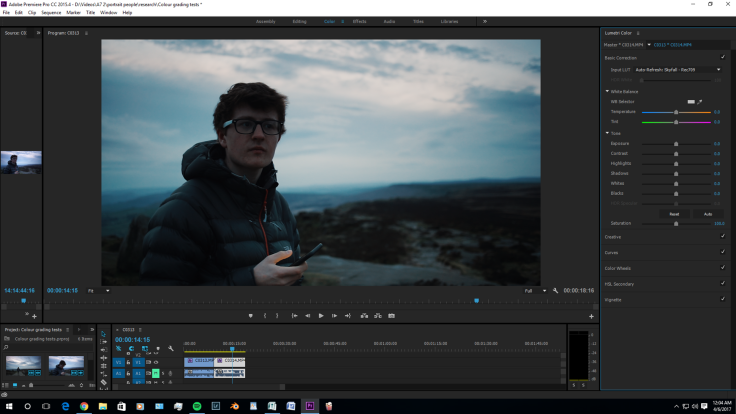


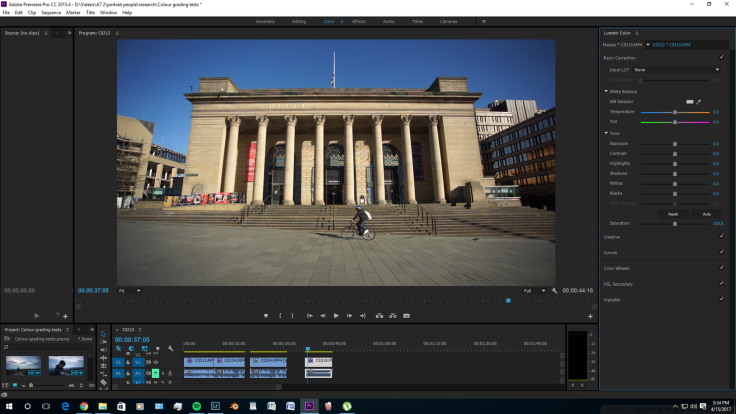


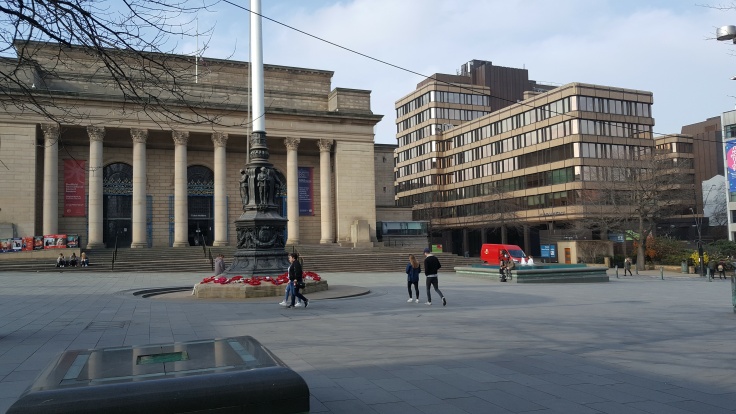

 Figure 21
 Figure 22
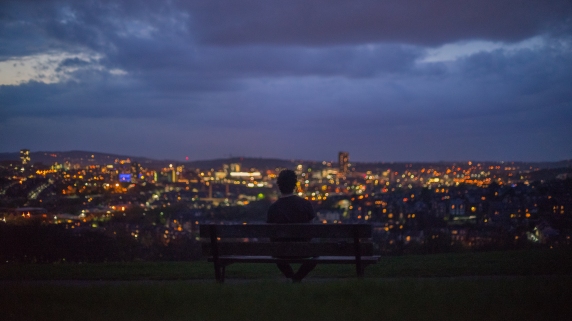 Figure 23
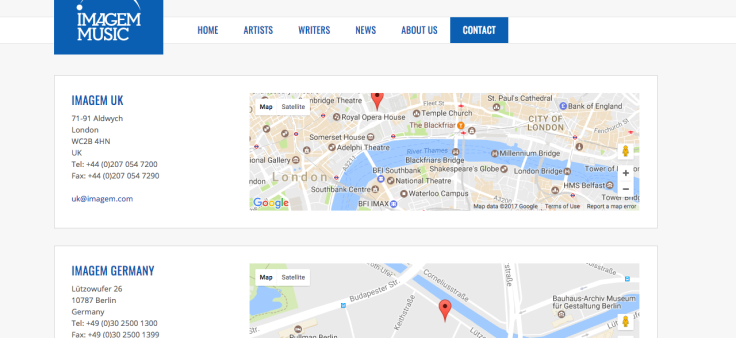
 Figure 21, shot 1 (Close up)
 Figure 22, shot 2 (more coverage)
 Figure 23, Shot 3 (more coverage)
 Figure 24, Shot 4 (end establishing shot)
 (Jonny Elwin, 2011)
 Figure 27, the shot before colour correction.
 Figure 28, the shot after colour correction.
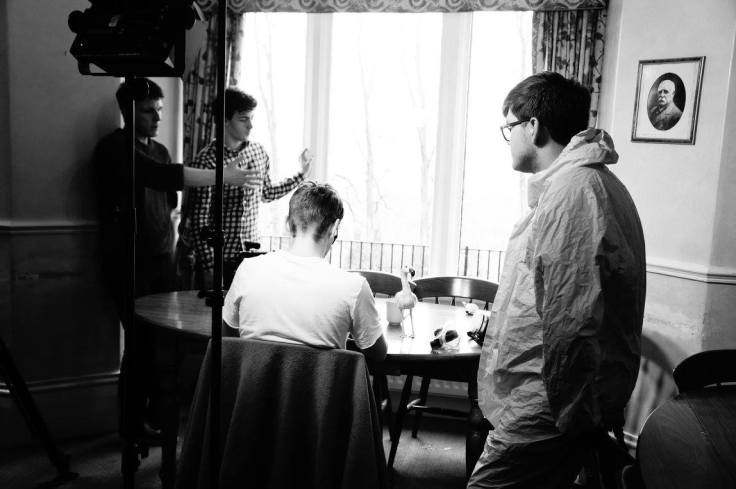
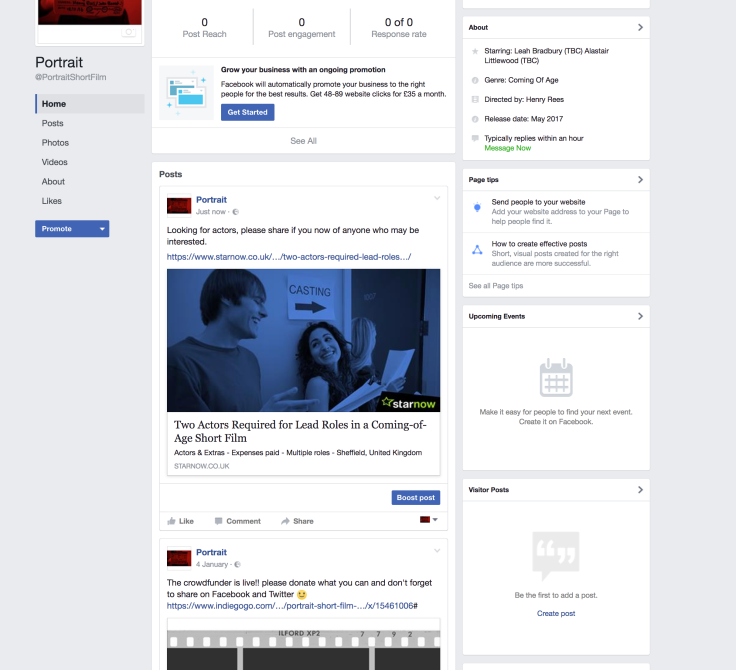


Recent Comments