Mood board and colour research


This mood board shows the two main colour pallets that I want to use for the film. The top half is the colour pallet that I want to use for the daytime scenes; the honeymoon phase montage, the opening scene with the fight the lower half shows the colour pallet I want to use for the evening and sunset scenes where they meet and where they talk about there relationship. The reasons I want to use these colour pallets for these scenes is that the pink and orange look are associated with romantic films so create a feeling of love and warmth which is what I want the audience to fell in the 3rd and 4th scenes. I want to use the orange colour pallet for scene 2 because the colour conveys happiness and in the scene the characters are happy.
To find out how to achieve this look I began by trying to advance my limited knowledge of colour grading in the Adobe CC suite. I looked found this video which explains how to make DSLR footage look more cinematic and how to bring jpeg images into speed grade for side by side comparisons. This will be useful to me as the first step to achieving the look I want. This is the Video https://youtu.be/vM-AAMKrcvQ.
Next I went to look at another colour grading tutorial from the YouTube Chanel Film Riot which spoke about the use of LUTs https://youtu.be/_4CsiaNn3uA. I decided that I liked there LUT package that they sold and it was on offer so I bought the package. The LUT package was from the Triune Store available here https://triune-store.myshopify.com/collections/ae-assets/products/triune-digital-assets-lut-pack. The next thing I did was shot some test footage whilst location scouting and performed primary tests on the footage to find out what LUT I like best for each this shot.
Grading tests for the scene 4
I found that for this scene most of the LUT’s were way too strong and contracted for the softer look that I want, for example the Guardians Of The Galaxy LUT (figure 1) was too teal and the Mad Max LUT (figure 2) was too saturated and teal. Finally I settled on a LUT to replicate the general grade of Skyfall (figure 3), I chose this LUT because of it realistic colour and how it dealt with an underexposed image.
Fig- 1

Fig- 2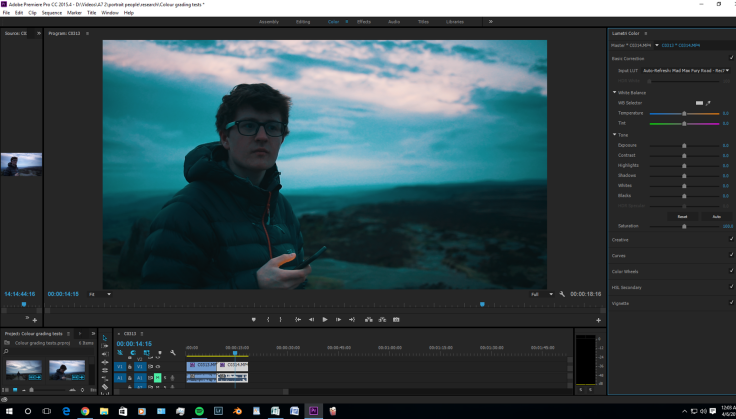
Once I had picked the LUT I want to use as the base for the colour grade for the final scene I began tweaking the image to be perfect for the shot. I began by changing the colour temperature slightly to get the style I wanted (Figure 4), then I tweaked the saturation and hue of the individual colour (especially the reds) to make the skin tones look better (figure 5) and then finally I adjusted the exposure of the shadows and blacks to make the subject more prominent in frame (figure 6).
Fig- 4
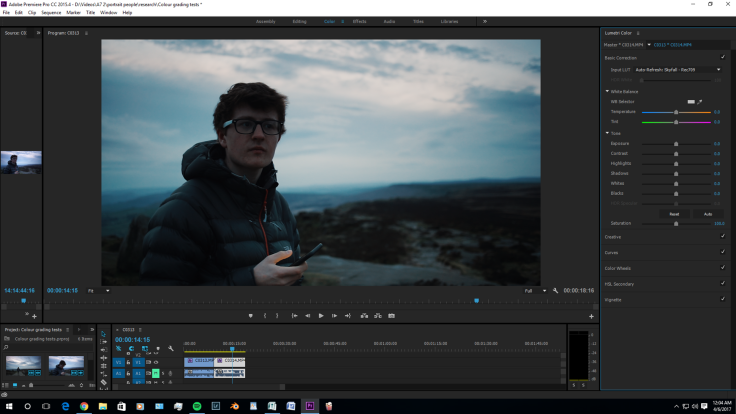
Fig- 5
Fig- 6
Read articles about how the look and Principe is achieved and then shoot in that style. (write how it links to the scenes in my film.
I tested for the daylight scenes. Firstly I took some test footage for the daylight scenes (fig 7), then I went through my Lut package and found that the Lut for Inglorious Bastards fitted with the look I wanted to achieve (fig 8). I then played around with the exposure and colour saturation to get the perfect final picture (fig 9).
Fig- 7
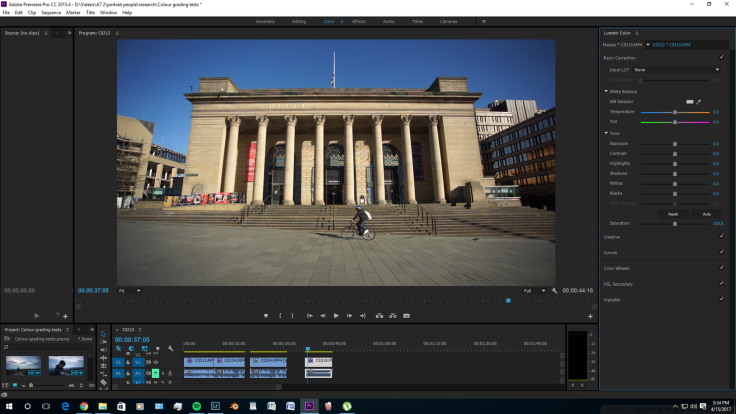
Fig- 8

Fig- 9
Location scouting
The film has 5 scenes that include 2 montages, scene 2 and 4. The first scene I need a hallway of a house, ideally it should be quite long and wide so I can fit the lighting and other equipment in easily. The second scene which is the first montage will include several shot within the city centre, some with close ups and some with wide shots, six locations will be enough. The third scene will need a place for the two characters to sit down and talk, this will be set at dusk and outside so practical lighting will be needed. I’m thinking about having a location overlooking the city centre as I can have the couple silhouetted against the city lights. Scene 4 is not a montage but its short and has no dialogue. It will feature the same shot over and over to create jump cuts to give the affect of time passing, in this scene the character will be travelling somewhere. Scene 5 is similar to scene 4 but will include minimal dialogue, the character will be taking pictures in the countryside at sunset.
For the hallway I need for scene 1 I looked at three hallways that I know that I can have access too. The first hallway (fig 10 and 11) was very dark so filming at night when I want to would be almost impossible, it also had a small porch on the front which would make one of the shots i’m planing very difficult to pull off. It would also be the least flexible for times to film. The second hallway I looked at is perfect in terms of the aesthetic (figure 12 and 13), its also very wide so I would have plenty of room for crew, sound and lights, this location will be my first choice if I can get access too it for the planed filming day. The third location was good but not perfect (figure 14 and 15). It was very narrow and had a cold uninviting look about it that I didn’t picture for the scene, the upside too it is it has a lamp post right outside the doorway which will be a good natural light source. This location I have the most access too so it will be my back up location if I cant film in the second location.
Figure- 10

Figure- 11

Figure- 12

Figure- 13

Figure- 14

Figure- 15

The second scene is a montage that takes place in the city centre, I will need around 5 different locations. For this I looked at 14 different locations around Sheffield city centre and found 5 that would be suitable. For on of the shots I want a shilloeted shot of the couple crossing the road and one stopping the other to take a picture, I found 3 locations that fit the criteria, the first on Rockingham street looking up too West Street (figure 16), this probably looked the best visually but had the most traffic so finding a break in the traffic to get the shot would probably take a long time. the second location was Headford street (figure 17). This is a very quiet road so getting the shot without too much traffic would be easier, but there are buildings at the end of the street so the shot isn’t exactly what I wanted so I want use this location. The third location looks right for the shot but has less traffic than the first location. Its also on Rockingham street but further down the road where its less busy (figure 18). I will use the third location because its a good balance of aesthetics to practicality, I also looked at access and I found that there is a car park that’s only a 7 minute walk way and only costs £1 for 2 hours .
figure- 16

figure- 17

figure- 18

Another location that I would like to use in scene 2 is a large ornate building, possibly with columns. I found 2 in the city centre that would be good to film at. The first is the City hall in Barkers pool (figure 19), this location is my favourite visually but as its a busy aria, dealing with the public may become a problem on filming day. The second location that could work is the Weston park art gallery building (figure 20). It has a similar look to the city hall but is allot less grand. The upside to this location is the lack of public and Weston park is going to be another location I plan to get a shot in for the montage, one problem of this location is its very hard to find parking places as its near a hospital so has limited street parking spaces and the nearest car park is a 10 minute walk away.
Figure 19
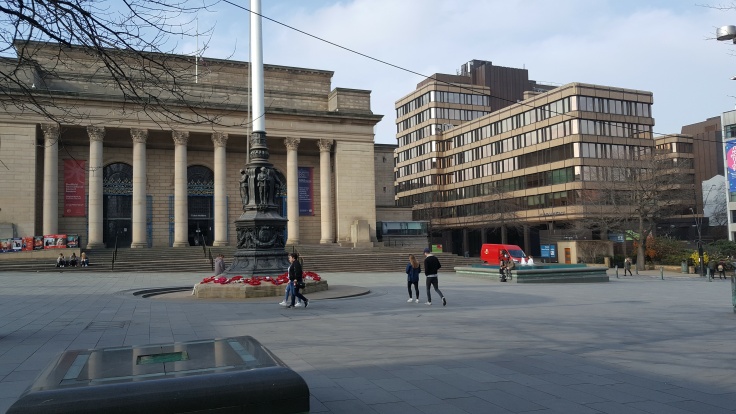
Figure 20

The final place I needed to recce to asses its suitability is scene 3 where they are overlooking the city. I had two locations in mind, the first is the amphitheatre in the City Centre, this location is great as there is easy parking and lots of light for a night scene (figures 21 and 22). The main setback with this location is that its on a steep slope meaning filming from behind requires a wide lens but the wide lenses I have access to aren’t fast enough for filming in dark locations, the other drawback with the steep slope is that I cant film from the front without a platform to bring me up to the same level. The second location I had in mind would work allot better as there is much more space around the characters for crew and equipment (see figure 23).
 Figure 21
 Figure 22
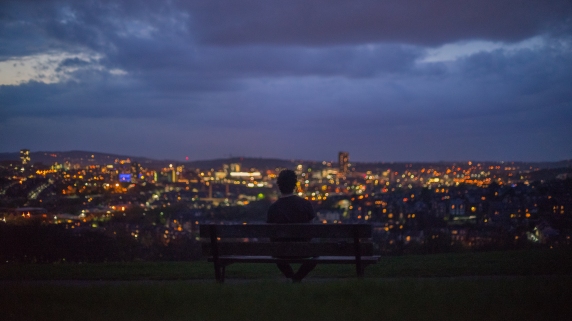 Figure 23
Music research
I want to look at what music I want to use for for the film, this its to speed up the editing process. Firstly I decided to confirm my understanding of copyright law. I did this by going to the library and taking out a book on copyright law. I began by checking exactly what copyright is and found out that ‘a copyright is a legal tool that provides the creator of a work authorship the right to control how the work is used, including the exclusive right to reproduce, distribute, adapt, display, and perform the work.’ (Fishman, 2012). My understanding of what I’ve just read is that copyright covers the creator of the work to control exactly what happens with the work, so for this reason I cant go and use any music. Upon reading further I came across a section about music music that wasn’t in the public domain, the section said ‘If you are dead set on using a particular copyrighted work, you can go ahead and do so if you obtain permission from the copyright owner for the use. Unfortunately, obtaining permission to use a copyrighted work can be a difficult and time consuming process and usage is usually not free.’ (Fishman, 2012). This means that a song that for a song that like and would fit perfectly in the film, if I contact the copyright holders and agin permission I can use the music in the film. I began the research into music by choosing a song from my film score library on Spotify that would work well in my film. The song I chose was a cover of blacks 1987 song Wonderful Life the cover is by Katie Melua. To get the permission to use the song I began with a Google search into how to find out the publisher for a song, I came across the website Ascap which can tell provide the rights owners and the contact details for most songs. This is the website Ascap https://www.ascap.com/repertory#ace/search/title/wonderful%20life/performer/Katie%20Melua.

On this website I found out that the rights to the song were owned with a 50/50 split between the writer (Colin Verncombe) and the publishers (Imagem). After finding out that the writer died last year I found the publishers website and got an email and telephone number for there London office.
As a way for finding another source of music I searched on YouTube ‘how to get music for films’ and I came across a video on the channel Film Riot called ‘compose music for your film’. It explains and promotes a program and Premiere Pro plugin thats used to easily score a film in realtime based on the tempo, mood and power desired from the music. I looked on there website and found that it costs either $9.99 for one month or $99 for a year, as it costs I will use it as a back up for music if I cant find anything cheaper.
Textural Analysis of a coming-of-age film
This is a textural analysis of a film within the genre i’m studying. The first will look at shot ideas and the structure of a montage within a coming of age film. This will help we when it comes to planning the shots for my production and giving me an idea of how to structure a montage.
The first scene i’m going to analyse is the montage sequence in Richard Ayoade’s Coming-of-age film Submarine. This scene follows the two main character having fun over the course of a few days, this sequence takes place at the height of the narrative arc, at the point where the protagonist is most happy in the film. The music playing in the scene is called Hiding tonight by Alex Turner, its a perfectly fitting song for the scene, it has a relaxing and mellow tone which puts the audience in the mood of the characters. My film will have a very similar montage to this one, I think that the use of this stye of music to put the audience in the right frame of mind is very effective and I will plan to do this in my film.
The opening shot is a tracking scene of the couple on a bike with a firework, this instantly sets the scene for the montage explaining to the audience what they’re doing, It then goes onto another tracking shot, matching the action. the rest of the montage is almost split up into almost 10 sub-scenes, theses sub scenes are where the couple take part in different activities. Each sub-scene has between 3 and 8 different angles covering the action but most of them are around 4 shots, none of them have any dialogue and aren’t linked to each other in anyway. I think they aren’t linked to each other because its set over different days, I can tell this by the non consistent time of day in each sub-scene. I really like this way of storytelling with montage that has scenes with in, i’m going to adopt this method for my montage, I will slightly interlace these sub-scenes thought to make it clear tot the audience that its on the same day. Within one of these sub scenes it will usually start with a close up or mid shot (example in figure 24), have two other angles covering the scene that give more information or progress the story of the scene (examples in figures 25 and 26) and then it will end with the establishing shot (example in figure 17). This backwards style really suits the film as its very quirky and reflects the characters personality, I like this method but it wouldn’t work with my film. I will adopt the 3 or 4 shot sub-scene structure as used in this montage sequence but I will arrange them in a more conventional manner, starting with the establishing shots.
 Figure 21, shot 1 (Close up)
 Figure 22, shot 2 (more coverage)
 Figure 23, Shot 3 (more coverage)
 Figure 24, Shot 4 (end establishing shot)
Script Focus Group
Once I had completed the first draft of script I sat down with several people who fit in the audience demographic for my film or studied film and asked for their advice on the script and how I could improve it. This is the first draft of the script – Portrait People (WT). Ex. . Everyone agreed that the first scene was great, it sets the character up for the film and there relationship to each other, one person thought that using the term “I’ve had coursework to hand in” didn’t seem fitting at most uni students would hand in papers, so I changed the line too “Ive had two papers due”. When it came too discussing scene 3 a few people raised the concern that the scene made the Isa an unlikable and annoying character and at the same time making there relationship seem in jeopardy when it was meant to convey the opposite. I took note of this and changed the lines of her complaining to the couple having a joke about racing to the bench, everyone agreed this was a much better way of starting the scene. One of the people I spoke too suggested that there conversation about food made Isa sound whiney and annoying and the dialogue didn’t seem real, I began to think about this and thought back to real conversations Id had and changed the conversation to be about her not being able to decide where she wants to eat, I then shoed this to the focus group and they all agreed that this seemed like a very real conversation that most of them have had before. This is the second draft that was developed as a result of the feedback from the first focus group – Portrait People (WT) 2nd draft.
I shoed the second draft to the focus group and my lectures, they all agreed that is was much better but the conversation in scene 3 on the bench made them seem like they were almost arguing, I decided to scrap the conversation about food and change it to Michael telling Isa a nostalgic story about why he loved this bench looking over the city. I thought that this was a much better conversation for the two too have as it still seemed real but it also gave the characters motivation to be there. Most of the people in the focus group agreed with the change but some thought it was a bit too cheeky and preferred the previous version a bout food. I decided to stick with the change. This is the 3rd draft of the script – Portrait People (WT) 3rd draft. My lecturer and one other person in the focus group said that I needed to be more clear with the stage direction and add more parenthetical’s to the dialogue to help the actors deliver the lines like I wanted them too, I did this and then I got the final draft of the script. Portrait People (WT) 4th draft
Festivals and distribution
It seems there are two main ways to distribute my film, the classic festival circuit or the more modern online method. I read an article by Lights Film School, the article suggested that the classic film festival circuit was the best direction to go in because its more prestigious to have a film shown in a festival than online. I also found from this article that “the average entry fee ranges from $20 – $100” this is a massive factor to consider when i’m deciding weather or not too go with the festival route because I don’t have any budget left. One of the suggestions for balancing the cost to risk of entering the festivals was to do a split between different levels of festivals. “Submit 30% to major festivals, submit 50% to mid-range festivals, submit 20% to niche festivals”, this was from this online article – lights film school. When looking more into the differences between online and festivals I saw a very interesting image (fig 25) that compares the statistics between the both.
(figure 25)
 (Jonny Elwin, 2011)
Looking at the statistics in this image, the online distribution plan is definitely the right way for me, its not as prestigious as the festival circuit but its free and it gets shown to allot of people. The purpose of my film is to be watched not make money, for this reason alone the option with more viewers is the better pathway.
I realised whilst researching online platforms that I could still enter festivals and have the film online. I googled enter my short film into festivals and I found the sites Withoutabox and FilmFreeway, they are both festival distribution platforms. https://www.withoutabox.com/filmmaker/festivalSearch#sort=-DEADLINE&categories=SHORT&statusType=ACCEPTING&page=1. In the platform there is a festival search tool, I used this to find the cheapest related festivals and I found the European independent film festival which is only $15 to enter so this will go on my list of films to enter. I wanted to find some festivals that are UK based so I found a list of great UK festivals to enter http://www.bfi.org.uk/education-research/bfi-film-academy-scheme/film-festivals-young-filmmakers I went though and found some that were cheap to enter. I decided that The Cinematic film festival Belfast, London Short film festival were good.
Once I had decided what festivals I wanted to enter I began research into online platforms. The main two platforms used are YouTube and Vimeo, I could put it on both but I wanted to find out which would be better. After some googling I came across a website discussing the pros and cons of Vimeo for film makers over YouTube http://filmshortage.com/youtube-vs-vimeo/. It made several good points, the first being that Vimeo has an ‘easy to find on/off HD toggle’ (Film Shortage, 2014) as opposed to YouTube’s hard to find setting button, this means that more people will watch my film in HD. Another point it made and one of the biggest selling points was that over half (56%) of the quality shorts were uploaded too Vimeo, this implies that any quality film I make should be swamped in the garbage that’s on YouTube. For one final decision maker I wanted to know more about the quality of the two sites, this blog https://blog.waterworld.com.hk/post/hd-quality-youtube-vs-vimeo compares the technical aspects of both sites. it states that ‘Vimeo’s bitrate is limited to 10Mbps for 720p and 20Mbps for 1080p’ (Blog.waterworld.com.hk, 2014) and ‘YouTube’s bitrate is limited to 3Mbps for 720p and 6Mbps for 1080p’ (Blog.waterworld.com.hk, 2014) so it appears that Vimeo’s picture quality is far superior as its compression is more than 3 times less than YouTube. based upon the research I think I will primarily use Vimeo to distribute my film because it has a better film making community on the platform and the video is less compressed meaning its better quality.
I conducted some research into what formats the festivals might need the film to be in to project it. I couldn’t find anything posted on the submission pages though Withoutabox and Film Freeway or there websites but I did find a website with a post dedicated to different formats festivals will and will not accept. I found that ‘There are many projectionists who still consider HDCAM to be the most stable format’ (Lobo-Navia, 2015) and they concluded this with ‘ If you can afford it and the festival accepts it, HDCAM‘ (Lobo-Navia, 2015). As the HDCAM format is unavailable to me because of the cost I kept on reading to fins domething that was. I then found out that I nedded to export a ProRes file and not a H.264, ‘The H.264 format was designed to encode high-quality video and audio content for streaming playback over the Internet. However, the same video that looks great on YouTube won’t look great on a large movie screen’ (Lobo-Navia, 2015) ‘Two popular codecs for proper video playback are Apple ProRes format and Avid DNxHD codec. Both also create lossy compressed video, but usually of much higher quality that holds up on a large cinema screen'(Lobo-Navia, 2015). Based on this research i’m going to export my film as an Apple ProRes file because it will hold the quality on a big screen, the festivals will accept it and it’s free. Next I conducted some more research into how to promote my film on Vimeo and give it the best chance of getting viewed. I found an article by a site called F-stoppers and it suggested two really helpful thing that I can easily do when uploading my film to Vimeo. The first helpful thing I found was that I should include a really eye catching thumbnail, ‘The thumbnail of your video is your movie poster. It needs to be intriguing and informative. Catch a viewer’s eye and convince them to watch your video’ (Berner, 2015). The second was that I need a really good and clear description ‘Your next area of focus should be your description. The first sentence or two should be a logline that boils the video down to its essential dramatic narrative in as succinct a manner as possible. This is your sales pitch to your viewer.'(Berner, 2015). I took these on board and used found a great frame form the film to use as a thumbnail, its saturated colours and great composition are really eye catching (figure 26). I then made a really simple yet descriptive video description – ‘A short coming-of-age story following three key stages of a young couples relationships’.
Figure 26 – the eye catching thumbnail for Vimeo.

During the editing process I came across a problem that occurred during principle photography, I had set the white balance wrong so the colour looked wrong. It was so wrong that I thought I had lost too much information too correct it. See figure 27 for the original image). I decided to research more advance colour grading techniques to see if there was a way to resolve my problem. I came across a video about correcting overexposed footage but the content still applied to my problem of potentially loosing colour information. It said that I should use the Lumetri colour panel instead of the exposure sliders which means that I have access to the individual RGB graphs and if I adjust them first then use the sliders I can alter exposure and colour without loosing as much information in the highlights. (Premiere Pro – Correcting Overexposed Footage, 2016). For the shot the colour correction see figure 28.
 Figure 27, the shot before colour correction.
 Figure 28, the shot after colour correction.
Bibliography
Blog.waterworld.com.hk. (2014). HD quality of YouTube vs Vimeo | Water’s Blog WIP. [online] Available at: https://blog.waterworld.com.hk/post/hd-quality-youtube-vs-vimeo [Accessed 1 Jun. 2017].
Film Shortage. (2014). YouTube vs Vimeo. What’s the best choice for your film?. [online] Available at: http://filmshortage.com/youtube-vs-vimeo/ [Accessed 1 Jun. 2017].
Jonny Elwin (2011). How we launched our film online. [image] Available at: http://jonnyelwyn.co.uk/workflow-for-post-production-film-editors/online-distribution/ [Accessed 1 Jun. 2017].
Lobo-Navia, S. (2015). How to Deliver Your Film to a Festival | Filmmaker Magazine. [online] Filmmaker Magazine. Available at: http://filmmakermagazine.com/96184-how-to-deliver-your-film-to-a-festival/#.WTmXjmjyuUk [Accessed 2 Jun. 2017].
Berner, C. (2015). Five Ways to Get Your Video ‘Staff Picked’ on Vimeo. [online] Fstoppers. Available at: https://fstoppers.com/originals/five-ways-get-your-video-staff-picked-vimeo-100715 [Accessed 2 Jun. 2017].
Premiere Pro – Correcting Overexposed Footage. (2016). Available at: https://www.youtube.com/watch?v=3-RBbR73ocg&feature=youtu.be [Accessed 30 May 2017].
Fishman, S. (2012). The public domain. 1st ed. Berkeley, CA: Nolo, p.408 & p.409.

April 6, 2017 at 8:59 am
6/4/17: Develop mood board into more of a textual analysis.
Some good research is taking place.
think about coverage of the scenes.
Pre production, needs to be written up, script needs to be finished. Continue to work on over Easter.
LikeLike