Search

Henry Rees

Month

March 2016

Foley pre-production

Sounds I need – all the sounds I need for the production and there.

Risk Assessment New – I completed a risk assessment for the production of the sounds.

log sheet for sounds – This is the log sheet for the first day of production. Day 3 and 4 didn’t require log sheets as on those days I only had 1 or 2 recordings.

SFX, Foley, Music spotting cue sheet – The final spotting sheet with the timecodes and the sound number, this is what i will use in the production and post-production.

Foley sound development blog

Sound recording day1

I started out by recording all the easier sounds that I could do on my own. I set up the microphones on the pistol grips on tripods in a stereo configuration with the mics pointing into the source of the sound (on the floor) about 2 feet away from the source to ensure I recorder clean audio. I recorded all the footsteps with ease, it only took 1 or 2 takes to do most of the footsteps and I recorded all the table and stool shuffling along with the hat throw leg slap, clap and all the sounds with the pump with ease. The levels were good, they sounded right and it all went smoothly. The sounds with the pumps were more difficult though because The pump had to be pulled and pushed quite far so to keep in time with the bellows was quite difficult without it sounding rushed.

Sound recording day 2

Today I recorded most of the other sounds with other people. They wanted to re record the footstep recordings I did previously but they didn’t sound as good as the first recordings so i’ll stick with the first recordings. We also recorded all the sounds involving the balloons which took several takes because getting mic placements so the sound of breathing wasn’t picked up was difficult and getting the levels right so there wasn’t any peaking when the balloon poped was very difficult but we did it in the end and it sounded good.

Sound recording day 3

I recorded on my own today again. I recorded the creaks with the creak box that I built in my shed where I could clamp it in the bench vice. After allot of adjusting I managed to get it too work, although not as well as i’d hoped. it was difficult to control the type of creek that it made even following the guide from the website I found. In the end I managed to get it too work and the recordings sounded good.

Sound recording day 4

today I recorded with 2 other people to help. I recorded the crashing through the door sounds. these proved to be especially difficult as setting the audio level to not peak was difficult. Also getting the door to open quickly in a building full of slow open/closed door mechanisms was difficult so we had to put objects like metal bins, briefcases, boxes and bits of wood to make the crash more pronounced and comical which follows the conventions of older movies from the beginning of the 20th century.


Post production day 1

Today I took all the imported media and using the spotting sheet and the log sheet I named all the files and organised them to ease the editing process. I then opened a new project up in Adobe Muse CC and set it to ‘edit to video’ and imported the video so I could sink the sound up too the video. I then named every audio clip using the log sheet to help. Finally I imported all the audio and began the edit in chronological order.

Picture1.png

Post production day 2

I carried on

Foley sound research

The sounds that I’ve outlined as possibly difficult to record are;

  1. How to make the head getting bigger sound
  2. How to make the sound of the head blowing up
  3. Creaking door
  4. Throwing someone through a door
  5. The bellows
  6. Deflating head
  7. The squeaking of the lever on the valve

Primary Research;

The first sound I researched was the sound of the head deflating. First I tried just blowing out and seeing what It sounded like. It didn’t sound great. I then tried the sound of a released balloon but it sounded to harsh and uncontrolled. After this I tried the exhaling balloon again but this time I inched the neck to make it squeak, it sounded good but a bit too harsh so I the air out slower and it sounded better. I also tried the sound of a bike pump exhaling air slowly and it sounded really good. I decided that the best way to make the sound is to use both the slowly squeaking balloon and the bike pump and overlay them.

Whilst researching the head deflating sound I realized that I can get the sound of the head expanding from the sound of a balloon being blown up. I also decided that the best way for me to create the sound of the head exploding is to blow a balloon up until it pops.

I found some with bellows and listened to them but they didn’t make enough noise to make it clear of what it was. I tried the bike pump and it made the correct noise of the metal rubbing in the pump and the fast exhaling/inhaling air.

For throwing the man through the door I tried pushing through a door fast but it didn’t sound very good.I tried again but i put padding on the door so it wouldn’t hurt when I crashed through faster and then I put metallic and wooden obstacles in the way behind the door so they would fall and make a more comical falling sound.

Secondary research;

I couldn’t find any squeaky levers or doors so I needed to find replacement sounds. I did some research on the internet and found out how professional Foley artists create the sound for creaking floorboards and doors. I found a web page that explained hot Foley artists make certain sounds, this is the website – http://www.instructables.com/id/DIY-Sound-Effects/. It said that they use something called a creak box, and it shewed how to make the creak box so I did. (insert pic). After a bit of getting used to the creak box and working out how to get the optimal sound and changing the rope I managed to get great sounds for both the door and the lever but tightening the tension in the rope and turning the lever at different speeds to get creaks at a different pitch and speed.

I found a website called Incompetech which provide free silent movie music depending on the pace of the film. I listened to most of the medium pace music and decided that a piece called Fig Leaf Times Two. Its found here – http://incompetech.com/music/royalty-free/index.html?genre=silent%20film%20score.

Audio project – foley sound

For my audio project Im going to replace all the sound from the George Melies film ‘The Man With The Rubber Head’. I will mute the soundtrack and record individual sounds and cut them together in Adobe Audition cc.

I started with a little secondary research into what foley sound is and found this;

According to Sonnenschen “Foley sounds are primarily those created to accompany the noisemaking movement of actors in real time. Even if footsteps, coffee cup clinking, or squeaky leather chairs were recorded during the shoot , the standard practice is to replace them all in the Foley room for the sake of uniformity and ability to isolate these sounds from the dialogue” (page 40, 2001)

I went through the video and noted down all the sounds ill need to get and when they occur in the film.

Sounds I need

  • Room tone – throughout
  • Water filling up – 00:06
  • 5 steps – 00:07
  • Picking up bottle – 00:10
  • Pouring liquid in glass bottle – 00:10
  • Putting bottle down – 00:12
  • Screw lid on bottle – 00:13
  • Pick bottles up together – 00:13
  • Pick stool up – 00:14
  • 3 steps on concrete – 00:14
  • Puts stool down – 00:16
  • Puts bottle down – 00:17
  • 3 steps on concrete – 00:19
  • Large wooden doors open – 00:20
  • Wooden table scrapes on floor – 00:21
  • Picks up table – 00:22
  • 6 steps on concrete – 00:22
  • Puts wooden table down – 00:25
  • Scrapes wooden table on floor – 00:25
  • 3 steps on concrete – 00:27
  • 3 steps on concrete – 00:29
  • Place small wooden table on large wooden table – 00:32
  • Turns valve lever on and off quickly – 00:33
  • Pulls head out of the box – 00:40
  • Puts wooden stool down – 00:45
  • Throws cap on floor – 00:47
  • Slaps knee then claps – 00:49
  • 3 steps on concrete – 00:54
  • 3 steps on concrete – 00:57
  • Places bellows on floor and squeezes them 4 times – 00:59
  • 10 pumps of bellows – 01:08
  • 8 pumps of the bellows – 01:20
  • Hand hits the bellows – 01:25
  • Turns air valve off – 01:26
  • Shuffles on stool – 01:27
  • Puts bellows down – 01:28
  • Sits down – 01:30
  • Stamps one foot down – 01:31
  • Turns air valve – 01:41
  • Stamps on floor several times in excitement – 01:40
  • Moves back on chair – 01:40
  • Turns air valve – 01:41
  • Stamps on floor – 01:43
  • Head deflating – 01:42
  • Stamps on floor – 01:48
  • Stands up – 01:48
  • 4 steps on concrete – 01:49
  • Opens door – 01:51
  • 4 subtle steps x 2 people – 01:52
  • 3 subtle steps – 01:56
  • Sits on chair – 01:58
  • Puts bellows in valve – 01:58
  • 4 pumps on the bellows – 02:00
  • Stands up 02:03
  • Shuffling noises x2 people – 02:04
  • Stumbles on chair – 02:06
  • 14 pumps on bellows – 02:06
  • Head explosion – 02:15
  • 10 shuffling steps – 02:07
  • Table chairs and people falling over – 02:16
  • 2 people stand up – 02:19
  • 3 steps fast – 02:20
  • Thrown through a door – 02:22
  • Kicks the door – 02:23
  • 3 steps – 02:25
  • 4 shuffling steps – 02:26


What will be difficult to get?

  1. How to make the head getting bigger sound
  2. How to make the sound of the head blowing
  3. Creaking door
  4. Throwing someone through a door
  5. The bellows
  6. Deflating head
  7. The squeaking of the lever on the valve

Website Evaluation


I was set with the task to create an online website portfolio. I intend to use the website to display my work to potential clients for freelance work. My initial ideas for my website were to keep it simple and minimalist and have a white and blue colour scheme. It needed to include a photography page, video page, about page and a contact page. Before This unit I had no skills in web design but I had use some of the adobe creative cloud programs so some of the skills were transferrable to adobe muse cc.

To help with the production of my website I first analysed two iother website portfolios to find the best features and see what to avoid and nclude in my website. I also created a research portfolio including font research, colour scheme research and a mood board of good website designs. I also used allot of youtube tutorials, here are some links to some of the videos I used;


The adobe muse inbuilt slideshow and contact widgets were very simple and easy to use. The YouTube video player widget I found to be more difficult to personalise the look and functions of the widget. The LR deck photography widget was very simple to use one you watched the video tutorial, although I wish that you could personalise it a bit more. For learning how to set up use and personalise all the widgets I use youtube tutorialonline muse forums.

I think that my websites design and style is a very modern and minimalist, exactly the look I was going for. The features are asy to use and functional. Its easy to read and find content. I think what makes a good website is aclean look that drwas a viewer in to find out more and I deffenetly think that kmy website does this by having a simle layout with thre small slideshows of my best work on the home page catching a viewers eye so they keep reading into the website.

I’ve tested my site in a browser and it works great. Its fast responsive and scales nicely to different screen sizes. There is one slow feature that I cant seem to do anything about and that’s accessing different folders in the photography page. This Is probably down to the widget that I used as it has to access my images from my Flickr account.

the main issue that I had to overcome is that I couldn’t use Avenir Next Condensed font like I wanted too as it wasn’t a web font so I had to make that logos and menu buttons in Photoshop and bring them into Muse as a PNG image file instead.

I did meet my original intentions as I created a sleek mo0dern looking stylish website portfolio that I think will draw viewers in to view the rest of my portfolio.


Screen Shot 2016-02-14 at 01.48.44

I’m very happy with the photography page. The widget I used (LR Deck) was easy to use and looks great. It gave me the look that I wanted which was miss matched positioning of my photos with no filler or borders between the photos. I also really like the light box feature in the widget.home page

I’m also very happy with the home page. I feel that its a simple and enticing home page that will draw the viewer in to the website.

website development log

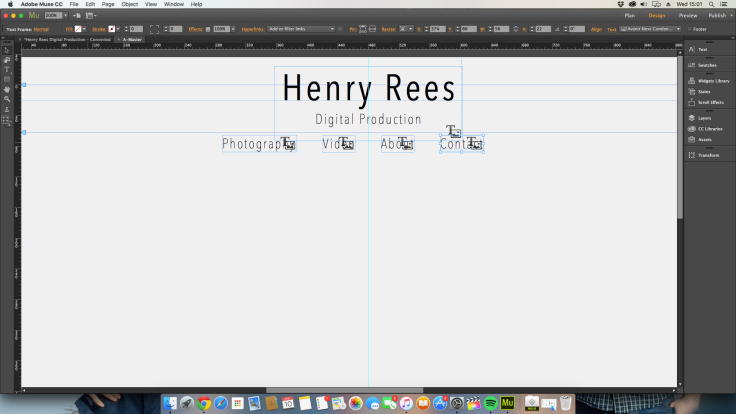
First I opened a new site in Adobe muse, I then opened up the A-master and set the background white colour to the hex value F0F0F0. Next I opened up Photoshop and created 6 separate images with the words; Henry Rees, Digital Production, Photography, Video, about and contact. These will be the menu buttons and the logo go to home button, They will be PNG files so that they can have an alpha background so the background white colours will match. The finished PNG files;

Henry Rees 3Phototgraphy 3Video 3About 3Contact 3Digital Production 3

I then positioned them to make the header like I planed.

Screen Shot 2016-02-10 at 15.01.44.png

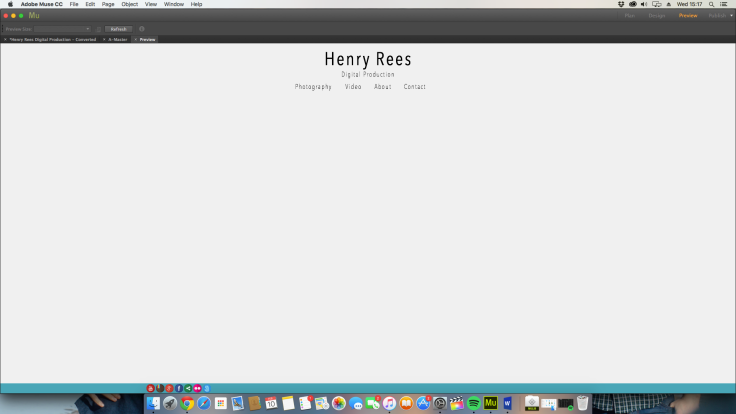
The next step was the social media links in the footer. I got the links from this website: http://www.land-of-web.com/freebies/icons/freebie-circle-flat-icons-retina-ready.html

For the footer I used the same blue that I got from the adobe colour picker which is 49A6B3. I then positioned and resized the social media icons.

Screen Shot 2016-02-10 at 15.14.03

This is the master page done

Screen Shot 2016-02-10 at 15.17.12


I then started working on the home page. I inserted 3 basic slideshows form the adobe widgets library and modified it by deleting everything apart from the arrows which I gave a see through background and positioned them over the photos to make it look neater. I added 5 photos from my photography portfolio to each slideshow and set the slideshow to revolve every 5 seconds and for them to initiate at different times, one after the other with a 2 second difference.

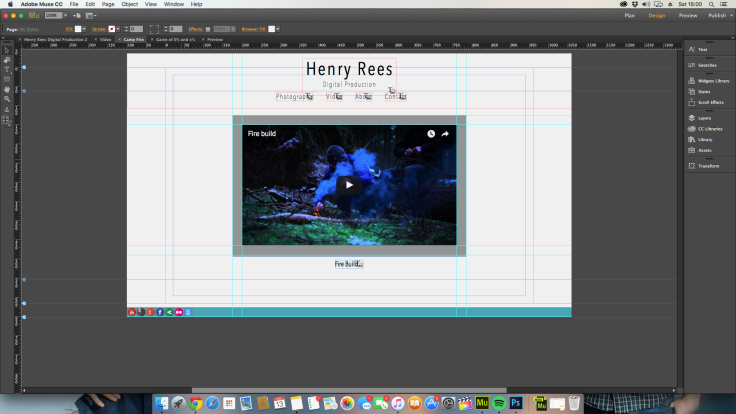
The next stew was making the video page. I draged the guidelines out to assist making three equal grey boxes. I then placed a slightly smaller thumbnail over each box, treating the grey box as a border.Screen Shot 2016-02-13 at 15.59.44

I added extra pages coming of the page video and linked the thubmnails too the corect extension pages. On the extention pages I added a youtube player with a grey border like with the previous page.

Screen Shot 2016-02-13 at 16.00.01

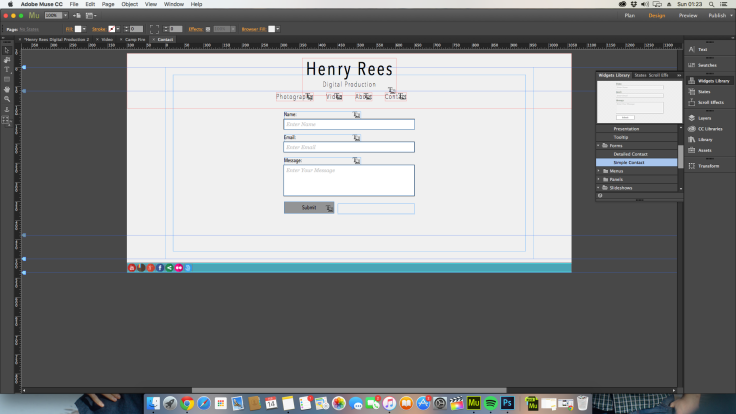
The next page was the contact page. I used the set adobe widget for this and placed it in the centre of the page. I chancged the font too match the rest of the site and temoved the border an filler to make it look simpler and sleaker. I made the text bokes pure white so there was acontast between them and the background so one could tell where to type.

Screen Shot 2016-02-14 at 01.23.08

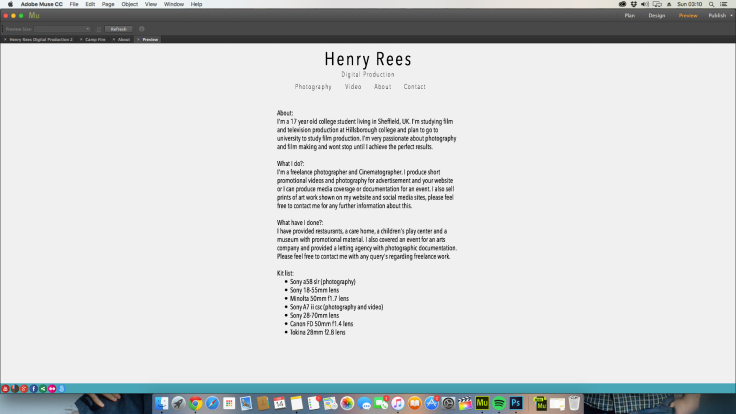
The second to last page was the about page, Again simple to do I juts insered a text box in the centre of the page like in my plan, set the font size too 12 and set the font to fit the rest of my site (Avenir next). I later found out that I couldent use Avenir next as it wasnt a web font so I changed it to Arial.

Screen Shot 2016-02-14 at 03.10.12


For the photography page I searched for a long time for a free widget that suited the style that I was looking for but I couldent find one so I had to buy one for $19.99 about £13.00. It was perfect for what I wanted. Its called LR deck http://resources.muse.adobe.com/products/lr-deck and linked to my Flickr account so I can manage the albums from my Flickr account.

Screen Shot 2016-02-14 at 01.48.44


Blog at WordPress.com.

Up ↑