This week I started with writing the proposal for my film. I also started looking at the codes and conventions for the genre of film that i’m making. I watched a film called High and Mighty which is a climbing documentary whilst at at film festival in week 1 researching the codes and convention of the genre that My film will be. This will impact my final product because it will show me what style to film the documentary in, what the audio is like and what the documentary should contain. I found out that A climbing documentary is filmed very cinematic with a lot of landscape shots and close up intense shots of the climber from a variety of angles including straight down, this is to make the film more intense. I also found that the documentary should contain interviews about the climb with the climber on location. I will now contain cinematic landscape shots of where the climb is and interviews with the climber in my film. I also looked at a visit wales advert to find out the cinematic and editing codes and conventions of a short adventure film. I found that it uses fast editing followed by a longer key shot that will have importance to the scene or narrative. This layout of editing is used to keep the audiences attention. The shots range from super wide shots of the landscape to close ups of peoples activity’s. These make for a visually stunning short film.
I also began primary research this week. I researched audio recording in windy situations as my film will be entirely shot outdoors. I tried recording an interview with the microphone in several different positions and locations and finally found that the best way to record clean audio in a windy environment is to have the interviewees back to the wind direction to block the wind and have the boom down low to get out of the direct wind and point the microphone upwards. This will impact my product because it will determine the position of the interview and the quality of the sound recording meaning that my film will be higher quality.
This week I’ve learned how to record clean audio in windy situations, I’ve also learned the codes and conventions of a climbing documentary and what to include in the production of one. The main problem that I’ve solved is how to record clean audio in the wind, I’ve also solved another problem that I had which was what to include in the documentary.
What I need to do next week – I need to make a presentation and present it to the class, then I need to vote for the films that will be made and get into a full production team and assign roles. I will also need to go on a location recce for whatever film i’m working on.
I started with a rough plan of what i was going to do in my head, I used this to write a proposal for the montage. Proposal distortion. I did use my proposal as it was the first guide to my planing, documentation and production. My planing was effective, it made it easy for me to know what shots to film and how to edit the final video. I didn’t meet the deadline I could have managed my time much better. The main constraint to consider was the drone shots especial at night so I had to use a specialist to assist with those shots. I don’t think that I could have conducted more effective research as this production didn’t require as much research as others for me.
2.Research
The main research that I did was into editing techniques and other post production techniques. The souses were very effective and informed me on how to achieve the effect I wanted to create in the edit. I used my research findings to assist with the editing process, specifically the distorted transition and the sound effects. I think that I should have done more research in pre-production as I ended up doing allot of research in post production when I realised I couldn’t do certain things.
3.the Product
I do think that my product is fit for purpose, It follows the codes and conventions of a montage as it has deep meaning in the shots and editing techniques but lacks a strong story line. I could have improved its fitness for purpose by writing a story line into the film. The parts that could have been improved are mainly the sound recording and the editing. The editing was rushed because I missed the deadline and the audio recording was recorded in camera and I didn’t have audio for allot of the shots meaning I had to use stock. The part that went well in my eyes is the cinematography. i like the shots I got and I think they work in the montage. The main technical skill I picked up as a result of the production is the ability to colour grade in Adobe Premier Pro CC. I didn’t do any audience research prior to the production as the film wasn’t aimed at anyone specific its just an art film that’s purpose is to reflect the feeling of distortion which it succeeds in. The film does adhere to media and ethical laws as I filmed all the shots and the stock audio I used was license free.
4.Conclusion
In doing the production again I would improve my planing by including what audio I needed to record, and in the research I would research more of the editing and colour grading techniques. For the product if I was to do the production again I would add a story line to the film.
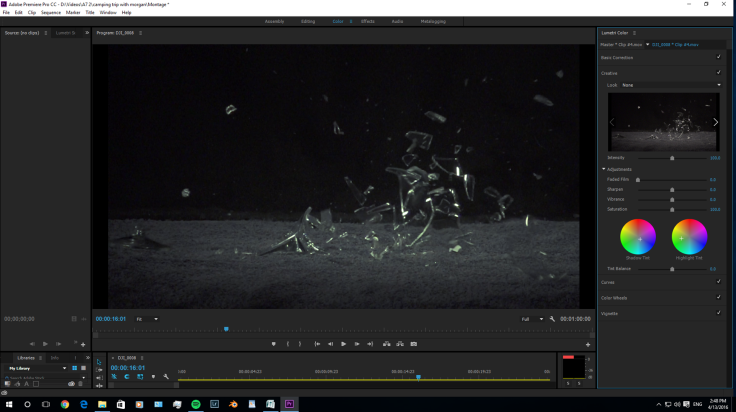
Today I started production of the montage. I began with the shot of the glass breaking. I filmed this in the TV studio at Hillsborough College. Because I was recording at 400 fps The shutter speed had to be 1/800 s meaning I needed to have allot of light, I had to use 2 850w lights pointing right at the glass and it was still under exposed by 1 stop but I wanted the shot to be under exposed. The original plan was to record at 800 fps but that meant cropping in the sensor to aps-c and lowering the resolution to 720p which would mean I would have had to upscale the footage so I decided to stick with the 400 fps. The final shot will do, it was sharp but its shot in avchd and I would have preferred xavcs but I had no choice as this was the only camera I could have used for the job. The towel on the floor was also visible, I didn’t plan on having the towel on the floor originally but it was necessary for collecting the broken glass.
Filming day 2
Today I started off by filming the crowd of people on the Moor. I like the shot but I wished that there were more people to give a more compressed look with a shallow depth of field in the crowds. I also filmed the drone shots. I’m very happy with these shots, especially the night shots in the city. We had an issue with filming in the city though and we ended up filming further up the road than we planed because there was a no fly zone above the nearby football stadium that didn’t show up on any no fly zone maps so the drone wouldn’t take of in the aria I planed on filming.
Filming Day 3
I filmed all the shots on the tram and at the tram stop and behind the train station without a hitch. I’m happy with all the shots apart from the one through the lens because I didn’t keep my hand still enough whilst holding the lens. I then filmed the shot with the glass photography ball at home. This was harder than I was expecting, even at f22 I found that the depth of field was too shallow and most of the newspaper text through the ball was out of focus. It was also really hard to track the rolling ball because it was hard to judge where it was going to go.
Editing
I started by opening a new Adobe Premiere Pro CC project (PP) and importing all the rushes. I soon found out that I couldn’t use the drone footage along with the Sony’s footage because the Sony’s was filmed in 1080p and the drones in 4k UHD. I figured id get round this problem by exporting the individual parts of the drone footage clips I needed as H.264 too keep the quality but selected the export resolution to 1920 x 1080 pixels. I then reopened a new PP project and imported all the rushes, this time importing the 1080p versions. I began bringing the clips into the timeline and roughly positioning them according too my original storyboard.
When I started trimming clips too length, adjusting audio and speed I realized some of the shots didn’t work as i’d planed in the storyboard. I decided to move the glass pane smashing to the last clip as the sound when its in reverse sounds great for and ending. I then organised the shots so they went in groups, first the drone shots with the distorted transitions, then the distorted reality segment broken up by the wine glass breaking and before the light distortion section I will put a rewind of the wine glass break. I forgot to record sound for the wine glass break so I had to use a stock sound, I found the sound from this web page https://www.freesound.org/people/reg7783/sounds/204185/, the sound clip is free and licence free.
I Distorted the image by separating the reds, greens and blues and then re positioned them and rotated them rapidly.
Editing day 2
Colour:
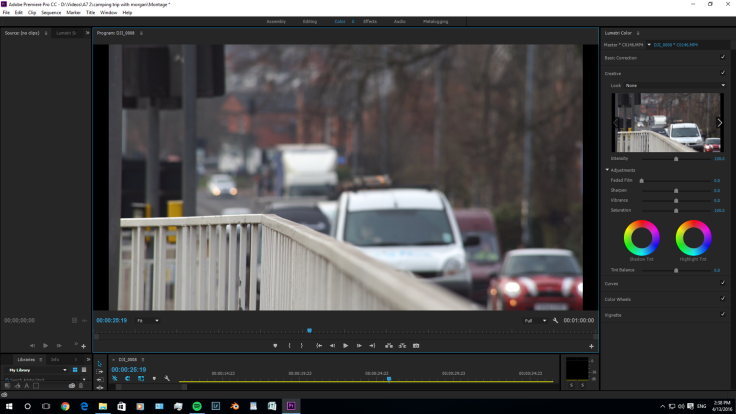
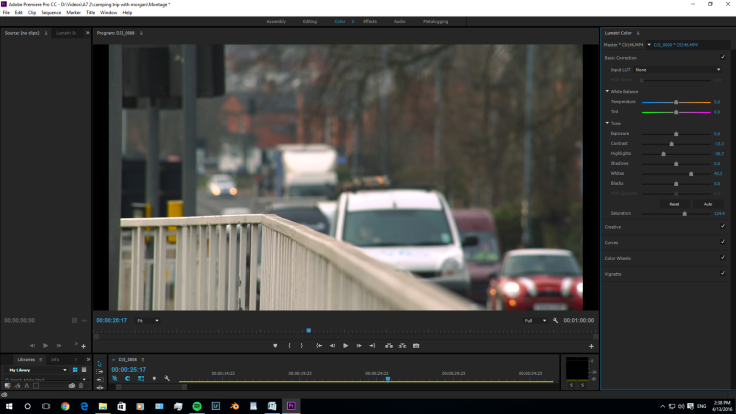
I graded the city life clips with a colder temperature with a greener tint shown after the physically distorted images to show how normal life is more dark and miserable than it might usually seem or how one may remember or view it. The rest of the shots I just corrected the colour and made the colour look more cinematic.
Grading a shot to look more cinematic.
The grading of a shot before and after.
I exported the primary edit to see what it was like as a finished video. Here is the Primary edit.
I realised that I hadn’t included enough sound in the edit and the entire video felt a little empty. I also wanted to bring back some of the shots that wouldn’t fit, for example the shot through the lens.
Editing day 3
Today I fixed everything I didn’t like about the initial edit. I started with adjusting some of colour grading that looked a bit too warm for my liking, this was in the city life shot near the beginning. I then went onto move some of the shots around to make more sense. i decided to move the glass breaking shot a few clips in so that there were city life shots before that were graded more naturally to the city life shots after the physical distortion. Next I shorted the shot of the man on the tram reading a newspaper, the shot of the tram passing and the shot of the people on the tram platform, this was all to make room for the shot which I initially couldn’t fit in. I then inserted the shot through the lens I wanted back in the video. The last thing I did was include some audio to the beginning shots of the montage. I started with a sharp wind noise for the opening drone shot. I got the sound from a free stock sound website called ‘Free SFX’ and I got the sound effect from this web page http://www.freesfx.co.uk/soundeffects/wind/. I used the sound of arking electricity for the distortion transition and I also got the sound from the website’Free SFX’ and I got it from the webpage http://www.freesfx.co.uk/sfx/electricity.
Here are the shot list for the distortion montage.
The shots I will be filming are :
A daytime drone shot in the countryside (camera tilts up to horizon)
A nighttime drone shot of a city (camera looking down
A pane of glass galling into focus and smashing
View of the countryside through a 50mm f1.4 lens
City view through a 50mm f1.4 lens
A medium close up of the electricity cable for the tram system as an ES for the next section
A low shot looking across the tram platform of people getting on/off the tram
A man sat on the tram reading a newspaper
Slow-motion shot of an old CRT TV getting smashed
man walking on underpass
man walking from a different direction on a different underpass
slow motion wine glass smashing
close up with shallow depth of field shot of people walking on a busy street
Out of the shots I want to get the most challenging shots to get will be the super slow motion shot of the wine glass breaking because allot of light is needed and the depth of field will be shallow and difficult to get the wine glass breaking in shot. to achieve the shot I will have to do some testing with lights, angles and positions to get the shot right. Another shot with a challenge is the shot through the 50mm f1.4 because i’ll have to keep my hand very steady holding the lens whilst filming.
I started my project with an rough plan of what I was going to do but I didn’t have a proposal. I was going to create Foley sound for the film Man with the rubber head by George Melies. My planing was very effective. I kept track of what files where what sound effects and at what time code they appear in the film. I didn’t meet the deadline for the production, I went over by several weeks. I could have managed my time much better but the main reason for the time delay was having to re record the audio as I managed to loose the audio clips during post production and I hadn’t backed them up. The main constraint I had to overcome were the difficult sound effects I dint know how to make i.e. the creaking sounds and the explosion. I overcame this through mostly primary research into what sounds like what but my research did include some secondary like the idea for the creak box which came from the internet. I don’t think that I could have planed my production more effectively but definitely the research i could have. I wasn’t entirely happy with some of the sound effects and that could have been sorted with some more research into more accurate sounding effects.
2.Research
My research consisted of both primary and secondary research. I tested sounds and techniques to find the optimal way of recording the audio and what effects sound correct. I also use secondary research to find out how to make a creaking noise for the doors and the lever and found a website (http://www.instructables.com/id/DIY-Sound-Effects/) that said how to build a creak box. I used my research to decide on the best way to record the audio in the production. I would have been better off in the production if I had conducted more research because the sound I recorded would have sounded more realistic and the final product would have been better.
I did basic research during the production. it mostly entailed finding the best spot in the room for recording the cleanest sound with the least echo and also finding the best way to use the props to get the best quality sound.
3.The Product
I think that the finished video is fit for purpose. It has realistic Foley sound over the top of the video which is the aim for the project. The parts that worked really well were the sounds at the start that include the table moving the glass bottles and the footsteps. I think they worked really well because they sound the most realistic. The parts that didn’t sound as realistic were the bellows pumping, the valve closing/opening and the explosion. I don’t think that these worked out as well and could have been improved because they could have been researched more to find better methods of creating the sound. The technical skills I developed as a result of this production are the ability to record good leveled clean audio and the ability to record Foley sound. My production does adhere to media law and ethical guidelines as all the Foley sound was recorded by me and the music is copyright free.
4.Conclusion
In doing the production again I would improve the planing by making a schedule so the production would be finished on time. I would improve the research by researching methods of creating certain sounds better, sounds like the lever and the explosion which didn’t sound great in the production. In the production of the audio I would have used a room that echoed less to make the sound effects cleaner and sound more realistic.


 Here are the shot list for the distortion montage.
Recent Comments